Engineer examining 3D printing model on laptop

What Is the STL File Format? A Clear Guide


TL;DR:

  • The STL file format describes 3D surface geometry as a mesh of triangles, mainly used for 3D printing. It stores only geometric data, with binary format being the most common for faster processing. Proper mesh integrity and verified scale are crucial for successful printing, as the format lacks unit or material information.

The STL file format is defined as a method for representing 3D surface geometry as a tessellated mesh of triangles, and it serves as the primary exchange format between 3D modeling software and 3D printers worldwide. STL stands for Stereolithography, a name inherited from the printing technology it was created to support. The format stores only geometric data: no color, no texture, no material properties, and no unit specification. Understanding what is STL file format means understanding its strengths and its hard limits, both of which directly affect whether your print succeeds or fails.

Close-up of STL triangle mesh 3D print

What is the STL file format and how does it work?

The STL format was developed by 3D Systems in 1987 to support the first commercial stereolithography 3D printers. That origin explains both its design and its limitations. The format was built for one job: describing the outer surface of a 3D object so a machine could build it layer by layer.

Every STL file encodes a 3D model as a collection of triangular facets. Each triangle is defined by three vertices and one outward-pointing normal vector. The normal vector tells the software which side of the triangle faces outward, which matters for determining the inside and outside of a solid object. Thousands or millions of these triangles combine to approximate any curved or complex surface.

What is STL file in 3D printing world?

ASCII vs. binary: two ways to store the same data

STL files come in two formats: ASCII and binary. ASCII STL writes every coordinate as human-readable text, which makes it easy to inspect but produces very large files. Binary STL stores the same data as raw numbers. Binary STL files are roughly 5 to 10 times smaller than their ASCII equivalents and load significantly faster. That size and speed advantage explains why approximately 95% of STL files in active use are binary.

The binary structure follows a fixed layout. Each file begins with an 80-byte header, followed by a 4-byte integer that records the total triangle count. After that, each triangle facet uses exactly 50 bytes: 12 bytes for the normal vector, 36 bytes for the three vertices, and 2 bytes for an attribute field that most software ignores. This deterministic layout is why binary STL loads so fast. Software can calculate exactly where each triangle starts without scanning the entire file.

Property ASCII STL Binary STL
File size Large (text-based) 5–10x smaller
Human readable Yes No
Load speed Slow Fast
Industry usage Rare ~95% of files
Header structure Text keywords 80-byte fixed header

Infographic comparing ASCII and binary STL file formats

Pro Tip: When exporting from CAD software, always choose binary STL unless you specifically need to inspect the raw file data. Binary files transfer faster, load faster in slicers, and cause fewer memory issues with high-polygon models.

How do STL files interact with 3D printers?

STL files do not control 3D printers directly. A printer cannot read an STL file and start printing. Instead, slicing software converts the geometry into machine-specific instructions called G-code, which tells the printer’s motors and extruder exactly where to move and when to deposit material. The STL file is the input; G-code is the output.

This two-step process has a major practical consequence. The STL file carries no print settings. Layer height, infill density, support structures, print speed, and material type are all decided inside the slicer, not stored in the STL. Two people can take the same STL file and produce completely different physical parts depending on their slicer settings.

The format’s compatibility is its greatest strength. Nearly every 3D printer on the market, from desktop FDM machines to industrial SLA systems, accepts STL files. Nearly every slicer program reads them without conversion. That universal support is why STL remains the default format for sharing and submitting 3D models, even as newer formats have emerged.

The 3MF format, created in 2015 by a consortium that included 3D Systems, addresses many of STL’s gaps. 3MF files can store color, material assignments, print settings, and multi-part assemblies in a single file. For multi-color or multi-material prints, 3MF is the better choice. For standard single-material prints, STL’s simplicity and universal compatibility still make it the practical default.

  • STL files store geometry only. No color, texture, material, or print settings travel with the file.
  • Slicing software reads the STL and generates G-code for the specific printer.
  • STL is compatible with virtually all consumer and professional 3D printers.
  • 3MF supports richer data but requires software that can read and write the format.
  • OBJ files carry UV maps and color data, making them better suited for visual rendering than for printing.
  • For CAD file format selection, the right choice depends on whether you need geometry only or full manufacturing data.

What are the most common STL file problems?

The single most disruptive property of STL files is that they are unitless. The format records coordinates as numbers with no attached unit. A value of “25” could mean 25 millimeters, 25 inches, or 25 centimeters. A common scaling error produces prints that are 25.4 times too large or too small because the slicer assumed millimeters while the CAD software exported in inches. Always verify the model’s dimensions inside your slicer before sending a job to print.

The second major problem is mesh integrity. A printable STL file must be “watertight,” meaning the mesh has no holes, no overlapping faces, and no inverted normals. Non-manifold geometry causes slicers to fail or produce incorrect toolpaths, which leads to print failures. A mesh with a single missing triangle can make an entire model unprintable.

Mesh errors are common because they are easy to create and hard to spot visually. A model can look perfect on screen while containing dozens of internal errors that only appear when the slicer tries to process it.

  1. Check scale first. Open the STL in your slicer and confirm the dimensions match your design intent before adjusting any other settings.
  2. Run a mesh validation. Use mesh repair tools available in most professional slicers or dedicated programs to identify holes, inverted normals, and non-manifold edges.
  3. Fix errors before slicing. Repair tools can close holes and correct normals automatically, but review the result to confirm the geometry still matches your design.
  4. Re-export cleanly from CAD. If errors are extensive, the most reliable fix is correcting the source model and re-exporting rather than patching the STL.
  5. Validate again after repair. Run a second check after any repair to confirm no new errors were introduced during the fix.

Pro Tip: Mesh validation is not optional for production parts. A model that prints successfully once can fail on the next run if the slicer interprets ambiguous geometry differently. Validate every file before every production batch. For a structured approach, the 3D design validation guide at Cc3dlabs covers this in detail.

STL vs. OBJ and 3MF: which format should you use?

STL’s simplicity is both its strength and its constraint. The format does one thing well: it describes surface geometry. That focus makes it universally readable but limits what information travels with the file. Understanding when to use STL versus alternative formats saves time and prevents avoidable errors.

OBJ is the most common alternative for visual work. OBJ files support UV texture maps, vertex colors, and material libraries, which makes them the standard for game assets, film rendering, and visual design. For 3D printing, OBJ’s extra data is largely irrelevant unless the printer supports full-color output. Most FDM printers ignore color data entirely.

3MF is the format most likely to replace STL for manufacturing workflows over the next decade. It stores geometry, color, materials, print settings, and multi-part assemblies in a single compressed file. 3MF was created in 2015 specifically to address the gaps that STL left open. The format is gaining adoption in professional environments, particularly for multi-material and multi-color printing.

Format Color/Texture Print settings Multi-part Best use case
STL No No No Single-material printing, universal sharing
OBJ Yes No No Visual rendering, color models
3MF Yes Yes Yes Multi-material, full manufacturing data

STL remains the backbone of single-material 3D printing because its simplicity guarantees compatibility. No slicer or printer rejects an STL file. That guarantee matters in production environments where reliability outweighs features. For printable templates and ready-to-print geometry, resources like CacheWerk’s 3D print files demonstrate how STL’s universal format makes sharing models across platforms frictionless.

Key Takeaways

The STL file format remains the most universally supported method for sharing 3D geometry for printing, but its lack of units, color, and material data makes mesh quality and slicer settings the true determinants of print success.

Point Details
STL stores geometry only No color, texture, material, or unit data travels with the file.
Binary format dominates ~95% of STL files are binary, which is 5–10x smaller than ASCII.
Slicers bridge the gap Slicing software converts STL geometry into printer-specific G-code.
Unitless files cause errors Always verify model dimensions in your slicer to avoid 25.4x scaling mistakes.
Mesh integrity is critical A watertight, manifold mesh is required for a successful print.

Why STL’s simplicity is still its superpower

After working with 3D files across dozens of production runs, I’ve come to a conclusion that surprises most people new to the field: the format matters far less than the mesh. I’ve seen beautifully structured 3MF files fail on the print bed because the underlying geometry had inverted normals. I’ve also seen bare-bones STL files produce flawless functional parts because the mesh was clean and the scale was verified.

The instinct to blame the format when a print fails is understandable but usually wrong. Print failures trace back to poor mesh health, not to STL’s age or feature set. The format is a container. What you put inside it determines the outcome.

That said, I do think the industry is at a genuine inflection point. 3MF adoption is accelerating in professional shops, and for good reason. Embedding print settings directly in the file eliminates a whole category of human error. When a client sends a 3MF with verified settings, the margin for misinterpretation shrinks considerably.

My recommendation for professionals: master STL handling first. Understand the binary structure, validate every mesh, and build a habit of checking scale before every job. Once those fundamentals are solid, adding 3MF to your workflow is straightforward. Skipping the fundamentals and jumping to richer formats just moves the problem around. The step-by-step 3D printing guide at Cc3dlabs is a good reference for building that foundation systematically.

STL will not disappear. Its universality is too valuable for everyday single-material work. But the professionals who thrive will be the ones who treat it as a precision instrument, not a default checkbox.

— Justin

Cc3dlabs handles your STL files from upload to finished part

Working with STL files at a professional level requires more than a clean mesh. It requires experience with how geometry behaves across different materials, layer heights, and printer configurations.

https://cc3dlabs.com

Cc3dlabs, based near Philadelphia, reviews every submitted STL file for mesh integrity, scale accuracy, and printability before a single layer is deposited. The team handles custom 3D printing services for prototypes, functional parts, and batch production, serving clients locally and internationally. Whether you need a single prototype or a production run, Cc3dlabs brings the technical depth to get your geometry off the screen and into your hands accurately. Request a free online estimate directly from the website.

FAQ

What does STL stand for in 3D printing?

STL stands for Stereolithography, the 3D printing technology developed by 3D Systems in 1987 for which the format was originally created. The name has since become synonymous with the file format itself across all 3D printing technologies.

What data does an STL file contain?

An STL file contains only surface geometry encoded as a mesh of triangular facets, each defined by three vertices and a normal vector. It stores no color, texture, material properties, unit specification, or print settings.

How do I open an STL file?

STL files open in any 3D slicer program, most CAD applications, and dedicated mesh viewers. Common options include slicer programs used for FDM and SLA printing, as well as browser-based viewers that require no software installation.

What is the difference between STL and OBJ files?

STL files store only surface geometry and are optimized for 3D printing workflows. OBJ files add UV texture maps, vertex colors, and material libraries, making them better suited for visual rendering than for manufacturing.

Why do STL files cause scaling errors?

STL files have no unit specification, so the same coordinate value can be interpreted as millimeters or inches depending on the software. A mismatch between the exporting CAD tool and the importing slicer produces prints that are 25.4 times too large or too small.

Marketing professional reviewing 3D printed retail displays

Retail Display 3D Print Applications: A Marketer’s Guide


TL;DR:

  • D printing offers custom retail fixtures, signage, and display models that enhance brand visibility and shopper engagement. It enables rapid prototyping, full-color pre-launch models, and material choices suited for different environments, minimizing costs and lead times. Using early-stage design with 3D printing improves efficiency and creates impactful signage, especially through lighting effects and structural reinforcement.

Types of retail display 3D print applications are the specific ways 3D printing technology produces custom in-store fixtures, signage, props, and product models that increase brand visibility and shopper engagement. The industry term for this practice is “retail display additive manufacturing,” though most marketers simply call it 3D printed retail display production. From countertop stands to full-scale trade show props, these applications give retail marketers direct control over design, material, and turnaround time. Cc3dlabs, based near Philadelphia, works with brands across all of these categories, delivering filament-based prints that meet real retail conditions. The sections below cover every major application type, material choice, and lighting technique you need to make informed decisions.

3D printer creating custom retail display fixture

1. Types of retail display 3D print applications marketers use most

3D printed retail displays fall into several clear categories, each serving a different merchandising goal. Knowing which type fits your situation saves time and budget.

  • Channel letters and dimensional signage. These are individual letters or logo shapes mounted to walls, shelves, or facades. They can be front-lit, halo-lit, or side-lit depending on the brand effect you want.
  • Countertop display units. Small printed frames, risers, and product holders that sit at point-of-sale. They are fast to produce and easy to swap between product lines.
  • Floor and endcap displays. Larger freestanding structures with 3D printed panels, brackets, or decorative elements. These often combine printed parts with standard retail fixtures.
  • Oversized product replicas. Giant versions of bottles, boxes, or devices used as window props or trade show centerpieces. Custom 3D printed props protect high-value items from damage or theft in retail and trade show settings.
  • Themed display environments. Printed architectural elements like arches, columns, or branded backdrops that turn a shelf section into an immersive brand space.
  • Shelf talkers and header cards with 3D elements. Flat graphics combined with printed dimensional accents that catch the eye at shelf level.

Pro Tip: Design countertop displays with a flat base plate that is at least 20% wider than the tallest printed element. This prevents tipping without adding weight.

The real role of 3D prints in retail is not to replace every traditional fixture. It is to fill the gaps where standard manufacturing is too slow, too expensive, or too inflexible for short-run or custom needs.

2. Trade show and pre-launch marketing models with full-color printing

Full-color 3D printed models are the fastest way to put a physical product in a buyer’s hands before production starts. Pre-launch 3D models enable marketing teams to conduct studio photography and retailer sell-in months before production units exist, removing product availability bottlenecks for promotional content. That means your catalog, press kit, and retailer presentation can all be ready before the factory ships a single unit.

The advantages of this approach are concrete:

  • Color fidelity. Full-color printing matches Pantone standards, so the model looks identical to the final product under retail lighting conditions.
  • Scale accuracy. Models can be printed at exact product dimensions or at a chosen display scale, giving buyers a true sense of size and proportion.
  • Surface finish. Post-processing techniques like sanding, priming, and clear coating produce a finish that photographs as well as the real product.
  • Speed. A model that would take weeks to source from a factory can be printed and finished in days.

A 2026 industry survey shows full-color marketing models improve retailer sell-in success and shorten product launch cycles significantly. That result matters because compressed launch timelines directly reduce carrying costs and lost sales windows. For influencer outreach, printed models also give creators something physical to photograph and review, which drives more authentic content than digital renders alone.

3. Materials and durability for 3D printed retail displays

Material choice determines whether a printed display survives one trade show or three years of retail floor use. The wrong material costs more in replacements than the right material costs upfront.

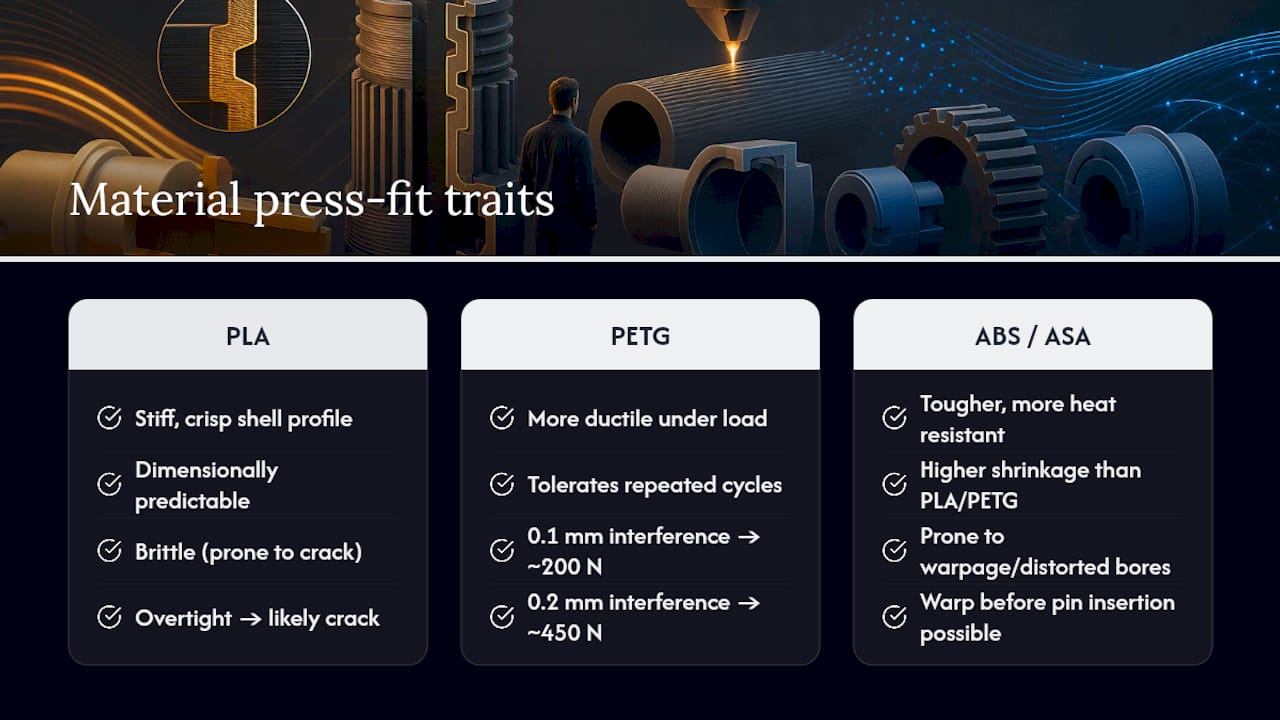
  1. PETG (Polyethylene Terephthalate Glycol). PETG is the standard for retail display prototypes because of its toughness, impact resistance, and crack resistance. It handles the bumps of shipping and repeated handling without becoming brittle.
  2. ASA (Acrylonitrile Styrene Acrylate). Best for displays near windows or outdoor retail environments. ASA resists UV degradation and holds color longer than standard ABS.
  3. PLA+ (Enhanced Polylactic Acid). Suitable for short-term indoor displays and trade show models where weight matters more than long-term durability.
  4. Fiberglass-reinforced composites. Large display props often incorporate internal fiberglass reinforcement to prevent deformation and cracking during shipping and repeated handling. This technique adds structural strength without significantly increasing visible bulk.

Pro Tip: Ask your print provider to add 40–60% infill density on any display part that will be handled by shoppers or moved between locations. Higher infill adds strength without changing the external appearance.

Material Best use case Durability level UV resistance
PETG Long-term retail fixtures High Moderate
ASA Window and outdoor displays High High
PLA+ Short-term trade show props Moderate Low
Fiberglass-reinforced Large structural props Very high Depends on coating

For guidance on outdoor display materials, the selection process follows the same logic: match the material to the environment and the expected handling frequency.

4. Lighting and visual effects enabled by 3D printed retail signage

3D printing enables a range of lighting effects that flat-printed signage cannot replicate. Front-lit, halo-lit, side-lit, RGB, and infinity-mirror retail signage each produce a distinct visual result, giving brands a full spectrum of options to fit their positioning.

The choice between lighting styles is a brand decision, not just a technical one:

  • Front-lit letters direct light outward toward the viewer. They deliver maximum visibility in high-traffic, brightly lit retail environments and work well for value-oriented or high-volume brands.
  • Halo-lit letters project light behind the letter onto the wall, creating a soft glow around the shape. Halo-lit signs create an understated, premium aesthetic favored by upscale retailers.
  • Side-lit panels illuminate from the edge, producing a clean, modern look suited to tech and lifestyle brands.
  • RGB programmable signs cycle through colors or respond to triggers like time of day or promotional events. They work best in entertainment retail or experiential pop-up environments.
  • Infinity-mirror effects use layered printed panels with reflective film to create a depth illusion. These are high-impact statement pieces for flagship stores or window installations.

The structural advantage of 3D printing here is direct. Printed letters can be designed with internal channels sized exactly for LED strip widths, which eliminates the hot spots and uneven glow that plague routed foam or cut acrylic alternatives. The result is a cleaner light distribution with less post-production adjustment.

5. How 3D printing accelerates prototyping and iterative display design

Rapid prototyping is the single biggest efficiency gain 3D printing delivers for retail display development. Rapid prototyping with 3D printing allows fast iteration of display parts, greatly accelerating product development cycles and reducing costs associated with molds and tooling. A design change that once required a new mold and a four-week lead time now takes an afternoon.

The practical benefits for retail marketers are specific:

  • Test before committing. Print a single unit of a new countertop display and place it in a test store before ordering 500 units from a traditional manufacturer.
  • Respond to buyer feedback fast. If a retailer requests a different height or a logo repositioned, the CAD file updates in hours and a revised print ships within days.
  • Run parallel design options. Print two or three versions of a display simultaneously and evaluate them side by side in a real store environment.
  • Reduce tooling costs to zero. No injection mold means no $10,000–$50,000 upfront tooling investment for short-run display components.

Low-volume manufacturing with 3D printing is particularly well suited to seasonal retail programs, where display designs change every quarter and volume per design rarely justifies traditional tooling. The 3D modeling process for these display components follows a structured workflow from concept sketch to print-ready file, which keeps revision cycles tight and predictable.

Key takeaways

3D printed retail displays deliver the most value when material, lighting, and prototyping decisions are made together from the start of the design process.

Point Details
Match material to environment Use PETG for long-term indoor fixtures and ASA for window or outdoor displays.
Choose lighting by brand position Front-lit signs maximize visibility; halo-lit signs signal a premium brand identity.
Use full-color models pre-launch Printed models enable retailer sell-in and studio photography before production units exist.
Prototype before scaling Print one unit to test fit, finish, and retailer feedback before committing to volume.
Reinforce large props internally Fiberglass reinforcement prevents deformation in large display props during shipping and repeated use.

Why most retail display programs underuse 3D printing

The brands that get the most from 3D printed retail displays are not the ones with the biggest budgets. They are the ones that bring 3D printing into the process earlier. Most retail marketing teams still treat 3D printing as a last-resort fix when a vendor falls through or a timeline collapses. That is the wrong frame entirely.

The real opportunity is at the front of the project. When you design a display with 3D printing in mind from day one, you get a faster approval cycle, a lower prototype cost, and a finished product that fits the retail environment precisely because you tested it there. I have seen brands spend more on one round of traditional tooling revisions than they would have spent on a full 3D printed prototype program for an entire product line.

The lighting question is where I see the most missed opportunities. Retail marketers often default to front-lit letters because they are familiar. Halo-lit and RGB options are not significantly more expensive to print, but they create a meaningfully different shopper response. The sign that makes someone stop and look is worth more than the sign that simply identifies the brand.

The future of 3D printing in retail is not about replacing all traditional display manufacturing. It is about owning the early stages of every display program, from concept model to in-store test, before any traditional vendor gets involved. That shift alone changes the economics of retail display development.

— Justin

Cc3dlabs custom retail display printing services

Cc3dlabs produces 3D printed retail display components for brands that need fast turnaround, accurate color, and parts built to survive real store conditions.

https://cc3dlabs.com

From countertop display units to large-scale trade show props, Cc3dlabs handles multi-color and multi-material printing with the material expertise to match the right filament to each application. The team also provides CAD modeling support, so you can move from a sketch or reference sample to a print-ready file without sourcing a separate design vendor. Request a free estimate through the 3D printing services page and get a quote specific to your display format, material requirements, and quantity.

FAQ

What are the main types of retail display 3D print applications?

The main types include dimensional channel letter signage, countertop display units, floor and endcap fixtures, oversized product replica props, and themed environmental elements. Each type serves a different merchandising goal and can be produced in materials matched to the display’s expected lifespan and handling conditions.

What material works best for long-term 3D printed retail displays?

PETG is the standard choice for long-term retail display use because of its impact resistance and crack resistance. For displays near windows or in outdoor retail settings, ASA offers better UV stability and color retention over time.

Can 3D printed models replace physical product samples for retailer meetings?

Full-color 3D printed models can replace physical samples for retailer sell-in meetings, studio photography, and press kits. They match Pantone color standards and can be produced months before factory production units are available.

How does 3D printing reduce retail display development costs?

3D printing eliminates tooling costs entirely for short-run display components, which removes the $10,000–$50,000 mold investment required by traditional injection molding. It also shortens revision cycles from weeks to days, reducing the total cost of design iteration.

What lighting options are available for 3D printed retail signage?

3D printed retail signage supports front-lit, halo-lit, side-lit, RGB programmable, and infinity-mirror lighting effects. The right choice depends on brand positioning, ambient store lighting, and whether the sign needs to attract attention or signal a premium identity.

Technician 3D scanning aircraft part in workshop

Types of Industries Using 3D Scan Data: 2026 Guide


TL;DR:

  • D scan data captures precise physical geometry to improve quality, speed, and accuracy across industries. Its adoption enhances workflows in automotive, construction, healthcare, manufacturing, and cultural preservation by enabling real-time measurement and digital integration. Success depends more on software connectivity and post-processing automation than on hardware capabilities.

3D scan data is defined as the digital capture of physical geometry, converting real-world objects into precise point clouds or mesh models used for analysis, design, and production. The types of industries using 3D scan data now span automotive, aerospace, construction, healthcare, manufacturing, and cultural preservation. Each sector adopts 3D scanning, the recognized industry term for this technology, to replace slow manual measurement with full-surface digital capture. The result is faster decisions, fewer errors, and tighter tolerances across every stage of a product’s life.

CAD engineer working with 3D scan data at desk

1. Types of industries using 3D scan data: automotive and aerospace

Automotive and aerospace teams use 3D scanning for quality inspection, reverse engineering, and maintenance, repair, and overhaul (MRO). The shift from traditional coordinate measuring machines (CMMs) to handheld 3D scanners is the single biggest change in industrial metrology over the past decade.

  • Stamped part inspection: 3D scanners capture full surface geometry in minutes. CMMs measure discrete points and miss deformation patterns like springback in sheet metal.
  • Deviation maps: Real-time chromatic deviation maps show exactly where a part drifts from CAD nominal, giving production line operators immediate feedback.
  • Reverse engineering: Engineers scan legacy components with no surviving drawings and reconstruct parametric CAD models for redesign or replacement part production.
  • In-situ aerospace measurement: Aerospace scanning without disassembly captures engine inlet lip geometry at sub-0.03 mm accuracy, delivering certified digital inspection reports without pulling the engine.
  • Timeline compression: Replacing a two-month manual gauge design and build process with minutes-long 3D scanning reduces project timelines by at least 33%.

That 33% reduction is not a rounding estimate. It represents the difference between a gauge shop consuming two months of calendar time and a technician walking the shop floor with a handheld scanner the same afternoon.

Pro Tip: Before scanning stamped metal parts, apply matte reference targets to reflective surfaces. Shiny metal scatters laser light and degrades point cloud density, which forces expensive rescan sessions.

2. Architecture, construction, and facility management

Construction is one of the clearest examples of how 3D scan data benefits an entire project lifecycle, from design coordination through ongoing facility management.

3D LiDAR scanning reduces rework by up to 50% by catching clashes between mechanical, electrical, and plumbing (MEP) systems before installation begins. That number matters because rework is the single largest hidden cost in commercial construction.

How construction teams apply scan data

  1. As-built documentation: Scan the site at each major milestone and compare point clouds against the BIM model to confirm work matches design intent.
  2. Clash detection: Overlay scan data with MEP drawings to find pipe and duct conflicts before crews install anything.
  3. Renovation planning: Scan existing structures to get accurate geometry when original drawings are missing or outdated.
  4. Digital twin creation: Combine successive scans into a living model that facility managers use for space planning, maintenance scheduling, and emergency response.
  5. Quality assurance: Use scan-to-BIM comparison to generate deviation reports that satisfy owner inspection requirements.

The table below shows how scan data changes key construction metrics.

Workflow stage Traditional approach With 3D scan data
As-built verification Manual tape measure and sketches Point cloud vs. BIM comparison in hours
Clash detection 2D drawing review Automated spatial conflict flagging
Rework rate Industry baseline Reduced by up to 50%
Facility handover Paper drawings Accurate digital twin model

For teams managing large facilities, the archival scanning guide from Cc3dlabs covers how to structure scan data for long-term asset management.

3. Healthcare and medical fields

Healthcare uses 3D scanning to capture patient anatomy with a level of accuracy that traditional casting and manual measurement cannot match. Digital workflows replace casting sessions, cutting appointment time and improving fit for prosthetics and orthotics.

  • Prosthetics and orthotics: Clinicians scan residual limbs or affected anatomy, then send the mesh directly to a CAD workstation for socket design. The patient skips the plaster cast entirely.
  • Surgical planning: Surgeons import patient-specific scan data into simulation software to rehearse complex procedures on a digital replica before entering the operating room.
  • Dental and orthodontic labs: Intraoral scanners produce digital impressions that replace physical molds. Labs receive files, not trays of alginate, and produce crowns, aligners, and retainers from the digital model.
  • Bioprinting research: Scan data of tissue structures feeds into bio-printing workflows for research into custom implants and scaffolding.

Pro Tip: For prosthetic socket design, scan the contralateral limb as a symmetry reference. Designers use it to mirror geometry and reduce the number of fitting iterations the patient needs.

The speed advantage in healthcare is real. A scan session takes minutes. A traditional casting session takes 30 minutes or more, requires drying time, and still produces a static model that cannot be digitally modified.

4. Industrial manufacturing and reverse engineering

Manufacturing is where 3D scan data has its deepest roots and its most measurable financial impact. The core shift is from sampling-based CMM inspection to full surface geometry capture that reveals deformation patterns no point measurement can detect.

  • Reverse engineering: Scan a physical part, align the point cloud in CAD software, and reconstruct a parametric model. This is the standard path for legacy tooling with no surviving drawings.
  • Quality control integration: Real-time integrated scanning generates deviation maps on the production line, replacing end-of-shift inspection reports with live feedback.
  • PLM and quality system integration: The true value of 3D scanning comes from connecting scan data to PLM and CAD software, forming a digital ecosystem rather than treating the scanner as a standalone tool.
  • Post-processing management: Data alignment, mesh cleanup, and parametric CAD conversion can equal scanning time without automation. Teams that underestimate this step lose the efficiency gains they expected.

Transitioning to real-time integrated metrology reduces inspection costs by over 50% in high-precision manufacturing. Traditional inspection can account for more than half of a qualified metal component’s total production cost. That figure alone justifies the capital investment for most production managers.

For a practical breakdown of how to structure scan-to-CAD workflows, the scan to CAD workflow guide at Cc3dlabs covers the full process from raw point cloud to production-ready file. Teams dealing with industrial measurement challenges will also find that real-time scan integration directly improves process control at the machine level.

5. Cultural heritage, entertainment, and emerging fields

3D scanning extends well beyond factories and hospitals. Cultural heritage and entertainment industries use scan data to document, preserve, and recreate physical reality at a level of detail that photography cannot achieve.

  • Historic landmark preservation: Scan teams capture full building geometry before restoration work begins. If a structure is damaged, the scan record supports accurate reconstruction.
  • Museum archiving: Institutions scan artifacts to create digital records for research access, reducing physical handling of fragile objects.
  • Art restoration: Conservators use scan data to document surface condition before treatment and verify results afterward.
  • VFX and gaming: Studios scan actors, props, and environments to create photorealistic digital assets for film and game production. The scan replaces weeks of manual modeling.
  • VR and AR content: Scan-based environments give users accurate spatial context that hand-modeled scenes cannot replicate.
  • Biotech and emerging applications: Researchers scan anatomical structures to inform bio-printing and custom implant design, pushing 3D scan data into territory that did not exist as a commercial application five years ago.

The entertainment industry’s adoption of 3D scanning is a useful signal for other sectors. When a technology becomes standard practice in a field as cost-sensitive as film production, the hardware and software costs have dropped to a point where most professional organizations can justify the investment.

Key takeaways

3D scan data delivers the greatest value when integrated directly into existing CAD, PLM, and quality management systems rather than used as a standalone measurement tool.

Point Details
Automotive and aerospace lead adoption Handheld scanning cuts project timelines by at least 33% over traditional manual gauging.
Construction rework drops sharply LiDAR-based scan-to-BIM comparison reduces rework by up to 50% on commercial projects.
Healthcare replaces physical casting Digital anatomy capture speeds prosthetic design and eliminates plaster casting sessions.
Manufacturing gains real-time control Integrated scanning cuts inspection costs by over 50% by replacing batch post-process reports.
Software integration drives ROI Connecting scan data to PLM and CAD systems creates a digital ecosystem that multiplies scanner value.

What I’ve learned about 3D scan data adoption across industries

The conversation about 3D scanning almost always starts with hardware. Which scanner has the best resolution? Which one is fastest? That is the wrong question, and I have seen it derail more than a few adoption projects.

The hardware is good enough. It has been good enough for years. What separates teams that get real results from teams that buy expensive equipment and underuse it is software integration. If your scan data cannot talk to your CAD system, your PLM platform, or your quality management workflow, you have a very expensive ruler.

The second thing professionals consistently underestimate is post-processing time. Scanning a part takes minutes. Aligning the point cloud, cleaning the mesh, and converting it to a usable CAD format can take just as long without the right automation tools in place. Plan for that time before you promise your stakeholders a turnaround.

The trend I find most significant right now is real-time integrated metrology. Moving inspection from the end of a production run to the machine itself changes the economics of quality control entirely. You stop making bad parts instead of sorting them out afterward. That shift is what will push 3D scanning from a specialty tool to a standard production asset across every sector covered here.

My advice to any decision-maker evaluating 3D scanning: audit your data ecosystem first. Know exactly where scan outputs will live, who will access them, and how they connect to downstream decisions. The scanner is the easy part.

— Justin

Cc3dlabs supports your 3D scanning and production workflow

Cc3dlabs operates a professional 3D scanning lab near Philadelphia that handles professional handheld 3D scanning (accuracy to ~0.1 mm) for parts, prototypes, and complex assemblies. The lab’s outputs connect directly to CAD modeling and filament-based 3D printing, so your team moves from physical object to production-ready file without switching vendors.

https://cc3dlabs.com

Whether you need a single prototype scanned and printed or a batch production run built from scan-derived CAD data, Cc3dlabs covers the full workflow. The 3D printing services page lists current capabilities, turnaround options, and how to request a free estimate. Local pickup is available, and shipping serves clients across the country.

FAQ

What industries use 3D scan data most extensively?

Automotive, aerospace, construction, healthcare, and industrial manufacturing are the primary sectors. Each uses 3D scanning for quality control, reverse engineering, or documentation workflows that require full-surface geometry capture.

How does 3D scanning reduce construction rework?

LiDAR scanning compares physical site conditions against BIM models in real time, catching clashes and deviations before installation. This process reduces rework by up to 50% on commercial construction projects.

What is the difference between CMM inspection and 3D scanning?

CMMs measure discrete points on a surface. 3D scanning captures millions of points per second across the full surface, revealing deformation patterns and deviations that point measurements miss entirely.

How does healthcare benefit from 3D scan data?

Clinicians use scan data to design prosthetics, plan surgeries, and produce dental restorations without physical casting. Digital workflows are faster, more accurate, and produce files that labs can modify without a new patient appointment.

What should teams plan for before adopting 3D scanning?

Plan for post-processing time alongside scanning time. Data alignment, mesh cleanup, and CAD conversion require dedicated software and trained staff. Teams that skip this planning consistently underdeliver on the efficiency gains they projected.

Woman typing custom 3D print quote request email

Getting a Quote for Custom 3D Print: Full Guide


TL;DR:

  • Getting a 3D print quote requires a clean CAD file, clear project details, and understanding the cost factors involved. Accurate quotes depend on proper file formats, specified materials, quantities, and end-use information, with larger batch sizes lowering per-unit costs. Comparing quotes effectively involves confirming identical parameters and requesting detailed breakdowns to avoid surprises.

Getting a quote for custom 3D printing means submitting your CAD files and project details so a provider can calculate costs based on material, machine time, and post-processing requirements. The industry term for this process is a “print estimate request,” though most clients simply call it requesting a custom 3D print quote. Accurate quotes depend entirely on the quality of information you provide upfront. Providers like Cc3dlabs review file geometry, material suitability, and batch size before confirming any price. This guide covers what to prepare, how to submit your request, what drives pricing, and how to compare quotes with confidence.

What do you need to prepare before getting a quote for custom 3D print?

The single most important step before requesting a quote is preparing a proper 3D CAD file. Accurate quotes require CAD formats like STL, STEP, or 3MF with clean, watertight geometry. A 2D drawing or a photo gives a provider zero volume or geometry data to price from. If your file has open surfaces, inverted normals, or non-manifold edges, expect delays or a request to resubmit.

Beyond the file itself, you need to define your project parameters clearly before you reach out. Here is what to gather:

  • Material type and grade. Specify whether you need PLA, PETG, ABS, ASA, TPU, or an engineering-grade filament. Each carries a different cost and performance profile.
  • Color and finish. Note your target color and whether you need a raw print, light sanding, priming, or a painted finish.
  • Quantity and batch size. State your exact quantity. Pricing changes significantly at volume thresholds.
  • Functional requirements. Describe the end use. A bracket that holds 50 lbs needs different material and infill than a display model.
  • Tolerances and fit. If the part mates with another component, specify the clearance or tolerance class.
  • Deadline and delivery. Include your hard deadline and whether local pickup or shipping applies.

Pro Tip: Send a dimensioned drawing or reference image alongside your CAD file. It gives the reviewer context that geometry alone cannot communicate, especially for parts with critical mating surfaces.

Clarifying end-use application at the quoting stage is critical to selecting the correct materials and quality controls. Skipping this step leads to reprints, cost overruns, and missed deadlines.

Hands arranging 3D print files and prototype on table

How do you request a custom 3D print quote step by step?

Submitting a quote request is straightforward when you follow a clear sequence. Skipping steps creates back-and-forth that delays your estimate by days.

  1. Upload your 3D file. Use the provider’s online form or email. Cc3dlabs accepts STL, STEP, and 3MF files through its online quote request form. Compress multiple files into a single ZIP archive to avoid attachment issues.
  2. Select your material and technology. Choose the filament type and, if relevant, the print technology. Filament-based FDM is the most common and cost-effective option for functional parts and prototypes.
  3. Specify quantity tiers. Do not request a price for one quantity only. Ask for pricing at two or three volume levels so you can plan economically.
  4. Add post-processing instructions. State whether you need support removal only, sanding, priming, or a specific surface treatment. Providers price these separately.
  5. Note any special requirements. Include color matching references, insert hardware needs, or assembly requirements.
  6. Confirm your deadline. State whether your timeline is flexible or fixed. Rush orders carry a price premium.
  7. Wait for manual review. Most professional providers follow up with questions before confirming a final price. This is normal and necessary.

Pro Tip: Request pricing for 10, 50, and 200 units in the same submission. Batch pricing tiers reveal economies of scale that can shift your production strategy entirely.

One critical distinction: an instant online estimate and a confirmed professional quote are not the same thing. Final professional quotes often come in above automated calculator outputs because manual review catches wall thickness issues, support complexity, and failure risk that algorithms miss. Treat any instant number as a rough budget figure, not a binding price.

What factors drive custom 3D print pricing?

Custom 3D print pricing is not a single line item. It is a sum of several distinct cost components, each of which you can influence with better project planning.

Infographic showing factors influencing custom 3D print pricing

Pricing includes material volume, machine time, support burden, post-processing labor, and packaging. That last point surprises most first-time buyers. A small, geometrically complex part can cost more than a large simple block because it demands more machine time and cleanup labor.

Here are the primary cost drivers:

  • Material volume and type. Denser, engineering-grade filaments cost more per gram. High-infill settings increase material consumption directly.
  • Machine time. Print speed, layer height, and part orientation all affect how long the printer runs. Longer print times mean higher costs.
  • Support structures. Overhanging geometry requires support material that must be removed and disposed of. Heavy support burden adds both material and labor cost.
  • Post-processing. Sanding, priming, painting, and hardware insertion are billed separately. A raw print is always cheaper than a finished one.
  • Setup and quality control. Some commercial services set minimum order values to cover base operational overhead; CC 3D Labs quotes each job individually. This covers file review, machine setup, and inspection.
  • Rush orders. Expedited orders increase pricing substantially because they compress scheduling and raise the cost of any failure.
Cost factor What drives it up How to reduce it
Material volume High infill, dense filament Optimize infill for function, not maximum strength
Machine time Complex geometry, fine layer height Simplify geometry where tolerances allow
Support burden Steep overhangs, internal cavities Reorient the part or redesign to minimize overhangs
Post-processing Painted or primed finish Accept raw finish for non-visible or functional parts
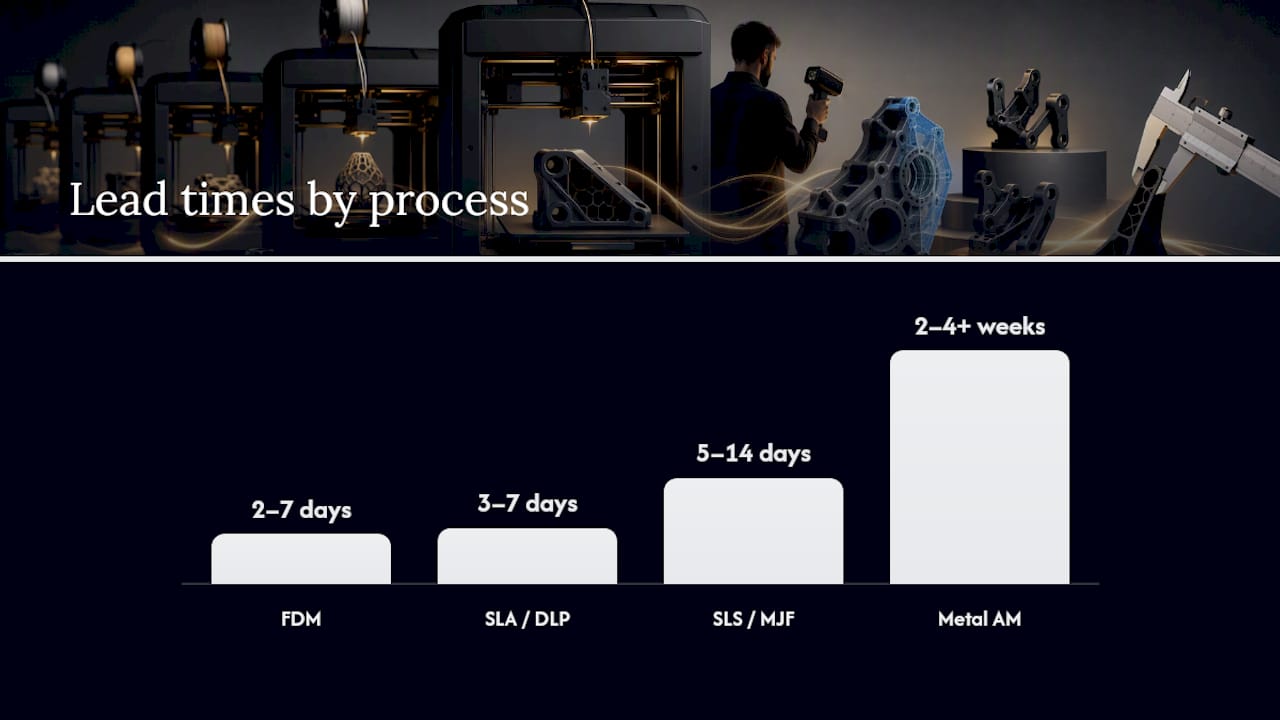
Rush premium Short lead time Plan orders at least two weeks ahead

Batch size is the most powerful lever most buyers underuse. Many providers discount larger batches because setup and handling overhead spreads across more parts — at CC 3D Labs, volume pricing is quoted per project after a test print of your actual part. If your project allows any flexibility on quantity, run the numbers at multiple tiers before committing.

How do you compare, negotiate, and validate 3D printing quotes?

Comparing quotes from different providers is only useful when all quotes describe the same job. One quote that includes support removal and another that excludes it are not comparable, even if the headline numbers look similar.

“Clients often treat a quote request as a single price check instead of a planning tool. Requesting pricing across multiple quantity bands, 10, 50, and 200 units, gives you a real picture of your project economics and often reveals a tipping point where a larger order pays for itself.”

Follow these practices to compare and validate quotes with confidence:

  • Confirm all parameters match. Verify that material, quantity, finish level, and lead time are identical across every quote you receive.
  • Ask what is excluded. Shipping, packaging, and quality inspection are sometimes listed separately. A low headline price can carry significant add-ons.
  • Request a breakdown. A credible provider will itemize material, machine time, post-processing, and overhead. Vague lump-sum quotes are a red flag.
  • Ask about revision handling. If the first print has a defect, what is the policy? Reprints, credits, and refunds vary widely by provider.
  • Verify lead time is realistic. A quote with an aggressive delivery date that the provider cannot guarantee creates project risk, not savings.
  • Plan for approval time. Factor in your own internal review and approval cycle when evaluating whether a quoted lead time actually works.

Machine time and support burden are primary cost drivers. A provider who explains these factors in their quote breakdown is demonstrating transparency. One who cannot explain why a small part costs more than a large one is not a reliable partner for complex projects.

You can also reduce your own costs before the quote stage. Reviewing your 3D printing cost strategies before submitting files often reveals geometry changes that cut machine time without affecting part function.

Key Takeaways

Getting a precise custom 3D print quote requires clean CAD files, clear project specifications, and an understanding of the cost components that providers use to build their pricing.

Point Details
File format is non-negotiable Submit STL, STEP, or 3MF files with watertight geometry; photos and 2D drawings cannot be priced.
Instant estimates are not final quotes Automated calculators frequently underestimate the confirmed professional quote due to missed geometry risks.
Batch size drives per-unit cost Larger batches usually bring per-unit cost down as setup overhead spreads across the run.
Rush orders carry a real premium Expedited timelines increase pricing due to compressed scheduling and higher failure risk.
Compare quotes on identical parameters Confirm material, finish, quantity, and lead time match before treating any two quotes as comparable.

What I’ve learned from watching buyers misread quotes

Most pricing surprises I’ve seen come from one source: buyers treating the first number they receive as the final number. An instant calculator gives you a floor, not a ceiling. The manual review that follows almost always adds cost because it catches what the algorithm missed, wall thickness violations, unsupported overhangs, and geometry that will fail mid-print.

The second most common mistake is submitting a quote request for a single quantity. I’ve watched product developers lock into a 10-unit order, receive the quote, and then discover that 50 units would have cost only 30% more in total. That math changes a sourcing decision entirely. Always ask for pricing across at least two or three quantity bands before you commit.

The detail that most buyers skip is the end-use description. Telling a provider “I need this printed in plastic” is not useful. Telling them “this bracket mounts inside an engine bay and sees 90°C continuous heat” tells them to quote ASA or a high-temperature filament instead of PLA. That single sentence prevents a failed part and a reprint cost. If you want on-demand custom parts that actually perform in their intended environment, the spec sheet you send in is the most important document in the process.

— Justin

Cc3dlabs makes precise custom 3D print quotes straightforward

Cc3dlabs handles quote requests for prototypes, functional parts, and batch production runs from its facility near Philadelphia.

https://cc3dlabs.com

Submit your STL, STEP, or 3MF file through the Cc3dlabs 3D printing services page and receive a detailed estimate that covers material, machine time, post-processing, and shipping. The team reviews every file for printability before confirming a price, so the number you receive reflects the actual job, not an automated approximation. Cc3dlabs supports multi-color printing, engineering-grade filaments, and batch pricing with volume discounts. Rush orders and design support are available on request. Local pickup near Philadelphia and domestic or international shipping are both options.

FAQ

What file format do I need to get a 3D print quote?

STL, STEP, and 3MF are the standard formats accepted by professional 3D print services. The file must have clean, watertight geometry; 2D drawings and photos cannot be used for pricing.

Why is my final quote higher than the instant online estimate?

Final professional quotes are often higher than instant calculator outputs because manual review identifies wall thickness issues, support complexity, and failure risk that automated tools miss.

How does quantity affect custom 3D print pricing?

Larger quantities reduce per-unit cost through tiered discounts. Volume discounts vary widely by provider and part — at CC 3D Labs, batch pricing is quoted per project after a test print.

What information should I include in a quote request?

Include your 3D file, material preference, required quantity, finish level, end-use description, tolerances, and your deadline. The more detail you provide, the more accurate and faster your quote will be.

Is there a minimum order for custom 3D printing services?

Some professional services set minimum order values to cover machine setup, file review, and quality inspection overhead; CC 3D Labs quotes each job individually. Check the provider’s terms before submitting a small single-unit request.