
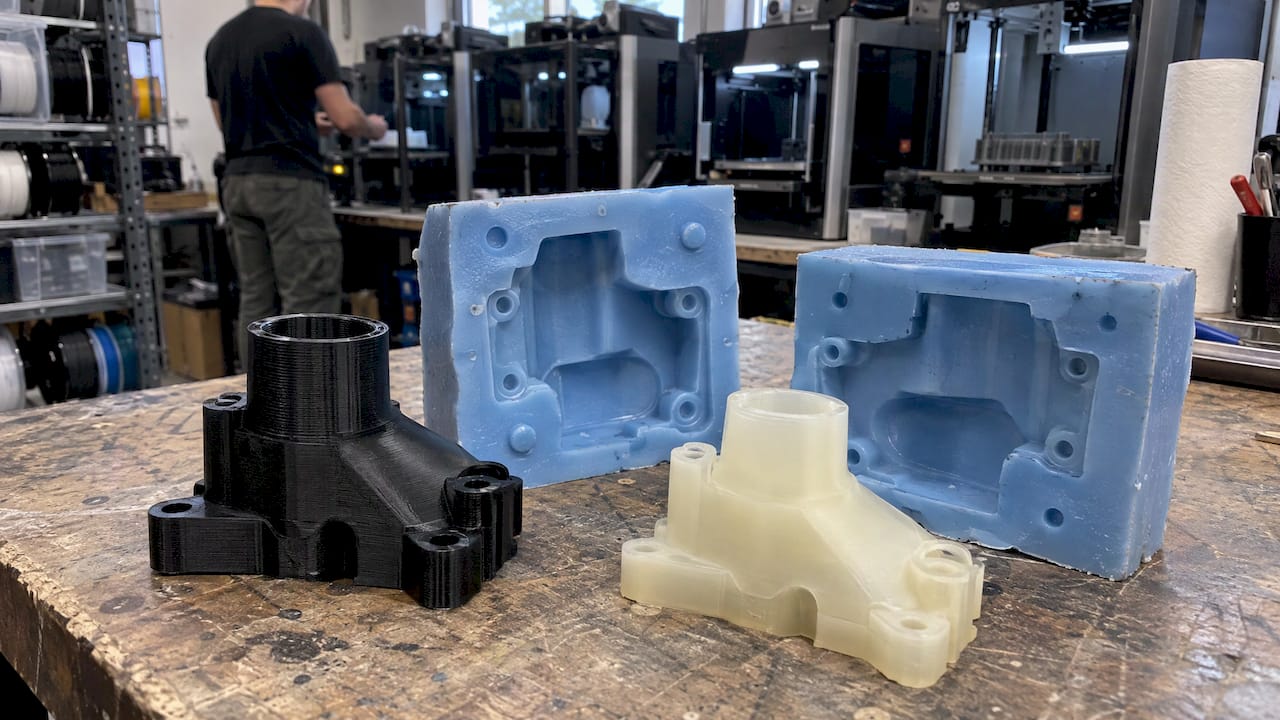
Yes, a 3D print makes an excellent master for a silicone mold, and the quality of the mold is decided before any silicone is mixed: by the dimensional accuracy of the master, the way its surface is sealed, and the release agent. We print and finish FDM mold masters at CC 3D Labs, and when the master has to match an existing part, we can start from a professional handheld 3D scan (accuracy to ~0.1 mm) and CAD. This guide walks through the full process for engineers, product developers and small-batch buyers, including the points where molds fail.
TL;DR
- A silicone mold is cast around a rigid master. A 3D-printed FDM master works well if its surface is sealed and a release agent is applied first.
- Printed FDM parts are porous at the layer lines, so silicone can grip them mechanically. Sealing and releasing the master prevents this.
- Use platinum-cure (addition-cure) silicone, keep sulfur, tin, latex and amine contaminants away from the master, and degas the mix to avoid bubbles.
- FDM masters typically hold about ±0.2–0.5 mm, so design the master with the final casting tolerance in mind.
- We quote every master individually after a test print of your actual model. Start at cc3dlabs.com/3d-print-quote/.
Table of Contents
- How silicone molding with a 3D print works
- Why a printed master suits low-volume work
- Step 1: Get the master right
- Step 2: Seal the master and apply release
- Step 3: Build the containment box
- Step 4: Choose, mix and degas the silicone
- Step 5: Demold and cast
- Why silicone molds fail, and how to prevent it
- Where a printed master helps most
- Our approach to mold masters
- Our perspective
- FAQ
- Sources
How silicone molding with a 3D print works
The principle is simple. You build a containment box around a rigid master, pour liquid silicone over it, let the silicone cure, and remove the master. What remains is a flexible negative. You then fill that cavity with a casting material such as urethane resin, wax, plaster or cement, and demold the copy.
There are two common ways a 3D print enters this workflow:
- The print is the master (the positive). The silicone captures its shape. This is the classic route, and the one this guide focuses on. Smooth-On demonstrates it with an extruded PLA part and a platinum-cure silicone.
- The print is the mold box or shell. A printed housing holds the master and the liquid silicone, so the box is disposable or reusable tooling and the silicone becomes the real mold.
You can also print molds directly for casting, but silicone itself is a poor fit for printing: silicone printers exist, but the technology is still niche and the results are typically too soft for many practical uses. For production-quality flexible molds, casting silicone around a printed master remains the standard approach. Our own guide to manufacturing-grade 3D printing covers what makes a printed part suitable as production tooling.
Why a printed master suits low-volume work
A silicone mold is the usual bridge between a one-off prototype and a small batch. Machined steel tooling is justified when you need thousands of parts. When you need ten, fifty or a few hundred copies of a part in urethane or another castable material, a printed master plus silicone is a practical route, because the master can be revised in CAD and reprinted when the design changes.
This is where the master’s accuracy matters most. A silicone mold reproduces whatever it touches: the shape, the layer lines, the blobs and the tool marks. If the master is off by 0.3 mm, every casting is off by roughly the same amount. Our tips for low-volume manufacturing with 3D printing explain how to plan a batch around that tolerance.
Step 1: Get the master right
Choose the print material by what it will face
For an FDM master, the material matters less for the silicone itself than for what the master endures: heat if you accelerate the cure, handling, sanding and release coating. Typical heat resistance, as industry averages, is about 60°C for PLA, 80°C for PETG and 100°C for ABS and ASA. If you plan to warm the silicone to shorten the cure, choose a material that stays rigid at that temperature. Our PLA vs PETG vs ABS comparison goes through the trade-offs, and our guide to annealing explains how to improve heat resistance without warping the part.
Design for the tolerance you need
FDM printing typically holds roughly ±0.2–0.5 mm, depending on geometry and size. Silicone itself shrinks very little: a Shin-Etsu technical data sheet for an addition-curing moldmaking silicone lists linear shrinkage below 0.10% after a 24-hour cure at 25 °C. That means the master’s accuracy, not the silicone, usually sets your dimensional error. If you need a master that matches an existing part, we can scan it, build the CAD model and print the master from that model.
Plan parting lines and draft
Orient the master so the casting can leave the mold without being locked in by undercuts. Silicone flexes, so moderate undercuts release, but sharp ones tear the mold over repeated use. If the master needs a two-part mold, add registration keys, such as divots and channels, so the halves align the same way every time. Design these features in CAD rather than improvising with clay.
Finish the surface
The mold copies everything. Layer lines, stringing and tiny pits will be on every casting unless you remove them. Sand, fill and prime the master to the finish you want in the cast part. Our overview of 3D print finishes lists the options, from sanding to coatings.
Pro Tip: Finish the master one grade finer than you think you need. Silicone captures detail that is barely visible on the bench.
Step 2: Seal the master and apply release
This is the step where most first attempts fail. Silicone generally does not stick to much, but porous surfaces with texture are the exception. Polytek’s guidance on preventing adhesion says porous, deeply textured surfaces can be tricky and suggests sealing them with a PVA solution, a sealer/release such as Pol-Ease 2350, or petroleum jelly.
FDM prints are porous at the layer lines, so the same logic applies. Smooth-On’s sealer and release agent reference guide says porous materials need to be sealed and then released, while nonporous materials need only a release agent, and it lists a print coating and a release agent for FDM, ABS and PLA masters.
A practical order of operations:
- Remove supports completely and clean the surface. Dust and residue transfer to the mold.
- Sand and fill defects you do not want replicated.
- Seal the surface with a coating suited to 3D prints.
- Let the coating dry fully before moving on. Wet coatings can interfere with the silicone.
- Apply release agent in a thin, even layer to the master and to any inside walls of the containment box.
The release agent matters wherever two materials touch: the master, the box walls and any inserts you plan to remove later. Polytek also notes silicones can stick to glass and some metals, so a flat glass base needs release too.
Step 3: Build the containment box
The box holds the liquid silicone in place while it cures. It can be printed, made from foam board, or assembled from plastic. A printed box has the advantage of fitting your master exactly, with registration to hold it in position.
Practical sizing rules:
- Leave enough silicone wall around the master. A common rule is 10–15 mm of clearance on each side, so the mold is thick enough to resist tearing.
- Make the base watertight. Silicone is thin when liquid and will find any gap under the walls. Seal seams with hot glue or modeling clay.
- Fix the master to the base so it cannot float or shift when the silicone is poured.
- Add a pour spout and vents if you will later cast into a closed two-part mold.
To estimate silicone volume, calculate the internal volume of the box in cubic centimeters, subtract the master’s volume, and add about 10% for waste. One cubic centimeter is about one milliliter. Most CAD packages report the master’s volume directly.
Step 4: Choose, mix and degas the silicone
For engineered parts, platinum-cure (addition-cure) silicone is the common choice because of its low shrinkage and clean cure. As an example of typical specifications, Smooth-On’s Mold Star 20T is a translucent Shore 20A platinum silicone mixed 1A:1B by volume, with a 6-minute pot life and a 30-minute cure at room temperature. It is rated for roughly 420 psi tensile strength and 470% elongation at break, with a useful range from -65°F to 450°F. Other silicones cure slower, in the range of hours to a full day, so always follow the product’s own data sheet.
Mixing
- Measure accurately, by weight where the data sheet allows it, and mix thoroughly for the full stated time.
- Scrape the sides and bottom of the container, because unmixed material leaves soft or tacky spots in the mold.
- Mix slowly. Whipping air into the silicone creates bubbles you will have to remove.
- Work inside the pot life. With a short pot life like the 6 minutes above, have the box, release and master ready before you open the containers.
Degassing and pouring
A vacuum chamber removes trapped air. The Shin-Etsu data sheet cited above describes deairing at 28–29 inches of vacuum, with the material expanding about four times in volume while it froths, and the cycle finishing roughly 10 minutes after frothing stops. Use a container at least four times the volume of your mix.
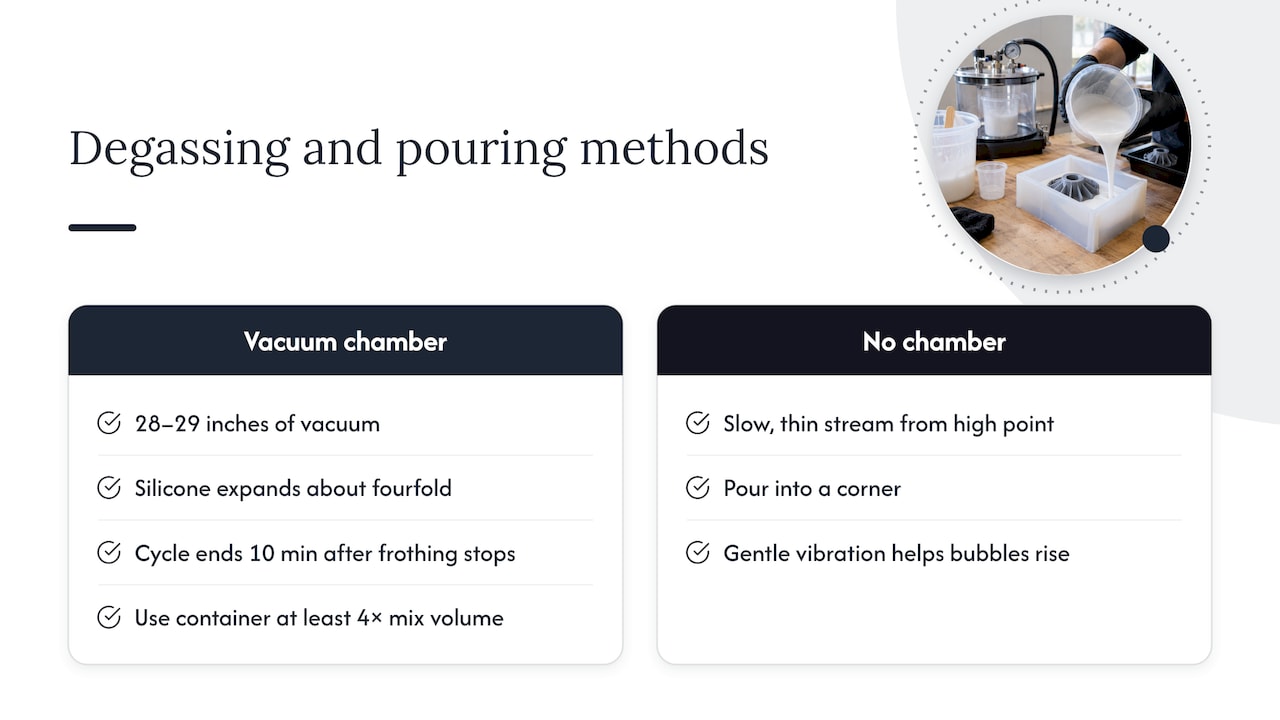
Without a vacuum chamber, pour slowly from a high point in a thin stream into a corner of the box, so the silicone climbs over the master rather than trapping air against it. Gentle vibration helps bubbles rise.
Curing
Let the mold cure undisturbed for the full time on the data sheet. If you heat an addition-cure silicone to speed things up, check that the printed master keeps its stiffness at that temperature, which is the reason for the material guidance earlier. Do not demold early to save time: a partially cured mold deforms and tears.
Step 5: Demold and cast
Once the silicone has cured, remove the box walls and cut or peel the mold away from the master. Silicone is flexible, so work slowly and pull from the edges rather than prying at one point. For a two-part mold, the halves separate at the parting line.
Before casting:
- Inspect the cavity for bubbles, tears and tacky areas.
- Apply the release agent your casting material requires.
- Clamp or band the mold halves so the pour cannot force them apart.
Then pour your casting material, whether urethane, wax, plaster or cement, according to its own instructions. For a two-part mold that was built by pouring one half first, clean every trace of clay and spray release before pouring the second half so the silicone does not fuse into one piece.
Why silicone molds fail, and how to prevent it
| Problem | Typical cause | Prevention |
|---|---|---|
| Silicone sticks to the master | Porous, unsealed FDM surface; no release | Seal the print, then apply release agent |
| Soft, tacky or uncured silicone against the master | Cure inhibition from contaminants | Keep sulfur, tin, latex, amines away from the master; test a small area |
| Bubbles on the mold face | Air in layer lines or mixed in | Seal the master, mix slowly, degas |
| Layer lines in every casting | Unfinished master | Sand, fill and prime before molding |
| Mold tears at demolding | Sharp undercuts or thin walls | Add draft, leave 10–15 mm of wall |
| Mold degrades after a few casts | Adhesion or wear from the casting material | Use release on every cast and match the silicone to the casting material |
Cure inhibition
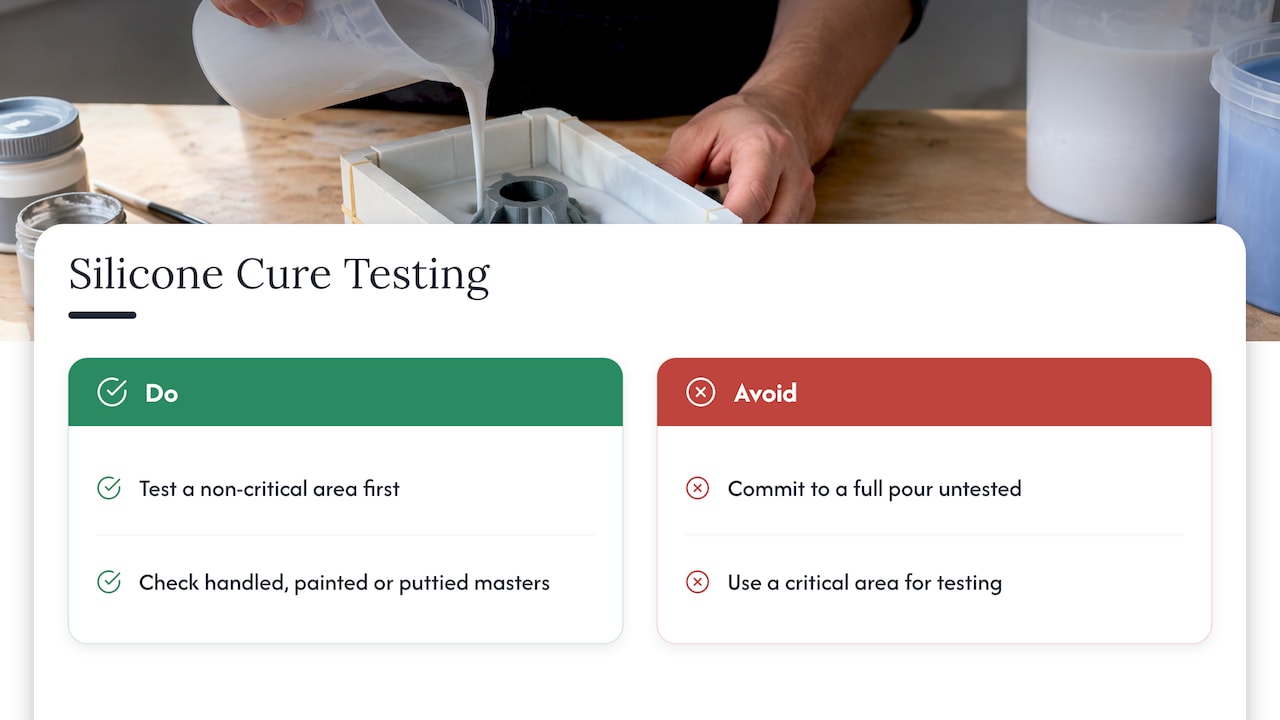
Platinum silicone is sensitive to chemistry. Smooth-On’s product information for Smooth-Sil 950 lists contaminants that can inhibit addition-cure silicone, including latex, tin-cure silicone, sulfur clays, certain wood surfaces and newly cast polyester, epoxy or urethane rubber. It recommends a small test application on a non-critical area before committing to a full pour. The Shin-Etsu data sheet adds sulfur compounds, amines and urethanes, and organo-tin and other organo-metallic compounds. If your master has been handled with gloves containing sulfur, painted, or filled with an unusual putty, test it first. A coin-sized test patch costs a few cents of silicone. A failed full pour costs the silicone, the master and the day.
Mold life
A printed master gives you a silicone mold, and the mold’s lifespan depends on the silicone, the casting material and how carefully you release and demold. Treat a first silicone mold as a tool you will remake when it shows wear. Because the master remains in your CAD files, remaking is a matter of reprinting, not rebuilding.
Where a printed master helps most
The process pays off in particular situations:
- Automotive and restoration parts. Obsolete trim, knobs, gaskets and brackets can be scanned, modeled and printed as masters, then cast in urethane or other materials.
- Product development. A design that is almost final can be molded in silicone to produce 20 to 50 pre-production parts in a production-like material.
- Small-batch runs. When the demand is in the dozens rather than thousands, the cost of steel tooling is hard to justify.
Our guide to high-quality scanning for manufacturing describes how a good scan feeds a good master, and the 3D modeling process for businesses shows how scan data turns into editable CAD.
Our approach to mold masters
We run a production farm of Bambu Lab FDM printers and print in PLA, PETG, ABS, ASA, PC and carbon-fiber nylon. We also offer professional handheld 3D scanning (accuracy to ~0.1 mm), scan-to-CAD modeling and printed mold masters. Each job is quoted individually after a test print of your actual model, because the right orientation, material and surface preparation depend on the geometry. Local customers can use residential pickup in the Greater Philadelphia area (there is no storefront), and completed orders ship anywhere in the United States.
If you have a part to reproduce, request a 3D scan quote. If you already have CAD, send it through the 3D print quote form. You can also see everything we do on our services page.
Our perspective
A silicone mold is only as good as the master behind it. We see the master as a precision part in its own right, not a throwaway pattern: its dimensions, its surface and its cleanliness carry straight into every casting.
That is why we build masters from the geometry you actually need. When the part exists already, we scan it with professional handheld 3D scanning (accuracy to ~0.1 mm), model it in CAD and print the master on our Bambu Lab FDM farm. When you design from scratch, we print a test model first and quote the job from what we learn.
The result is a master that is ready for sealing and release, and a clear route from a single prototype to a small batch of cast parts.
Justin
FAQ
Can I use 3D prints to make silicone molds?
Yes. Cast silicone around a rigid printed master inside a containment box, let it cure, and remove the master. FDM prints work well as long as the surface is sealed and a release agent is applied, because the layer lines are porous.
Does silicone stick to PLA?
Silicone generally does not bond to nonporous surfaces, but unsealed PLA is porous at its layer lines, so silicone can grip it mechanically. Smooth-On’s guide recommends a print coating and a release agent for PLA and other FDM masters, applied before the mold rubber.
Can you 3D print with silicone?
Direct silicone printing exists, but it is a specialized technology, and in many cases the parts are too soft for practical use. For most functional parts, engineers print a master in a rigid material, cast a silicone mold around it, and then cast the final part from the mold.
How long does silicone take to cure in a printed mold?
It depends on the product. Some platinum silicones cure in about 30 minutes at room temperature, while others need a full day, as in the Shin-Etsu data sheet’s 24-hour cure at 25 °C. Always follow the data sheet and leave the mold undisturbed for the full time.
How much silicone do I need?
Subtract the master’s volume from the internal volume of your box, both in cubic centimeters, and add about 10% for waste. One cubic centimeter is roughly one milliliter. Your CAD software can report both volumes.
To have a master printed, scanned or modeled, request a quote at cc3dlabs.com/3d-print-quote/, cc3dlabs.com/3d-scan-quote/ or cc3dlabs.com/3d-modeling-cad-quote/.
Sources
- How to Make a Silicone Mold of 3D Print, Smooth-On
- Sealer and Release Agent Reference Guide, Smooth-On
- How can I stop my silicone rubber from adhering, Polytek
- Mold Star 20T Product Information, Smooth-On
- Smooth-Sil 950 Product Information, Smooth-On
- Shin-Etsu addition-curing moldmaking silicone technical data