
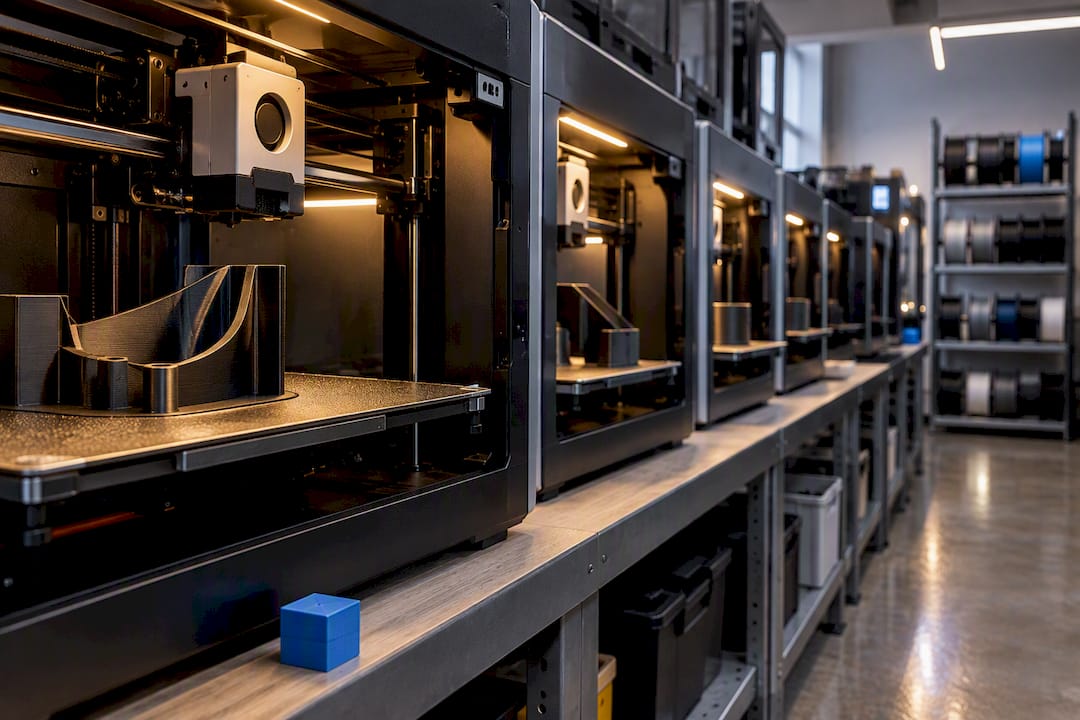
Lead time is the full span from file review and quoting through build prep, machine run time, post-processing, inspection, and shipping until the part is in your hands. FDM jobs typically run about 2 to 7 days, resin processes 3 to 7 days, powder-bed processes 5 to 14 days, and metal builds 2 to 4 or more weeks. Where you land in each range depends on finish, quantity, and how full the shop’s queue is.
TL;DR:
- FDM prints can often be completed within 2 to 7 days, but rush jobs may be delivered in 1 to 3 days if capacity allows.
- Post-processing steps like support removal, sanding, and inspection typically extend overall lead time beyond the actual print duration.
- Batch scheduling constraints and material availability often extend SLS/MJF and metal prints to 5 to 14 days or more, depending on volume and finishing steps.
- Small design issues such as thin walls or complex geometry can significantly increase print time by requiring slower settings or additional support.
- Supplying complete, well-prepared files and confirming quantities and finish details upfront reduces delays caused by clarifications and reorders.
Table of Contents
- How Long Does 3D Printing Take By Process?
- What Stages Make Up Total Lead Time?
- How Do You Estimate Print Time Without a Slicer?
- How Can You Shorten 3D Printing Lead Times?
- How Does CC 3D Labs Quote and Manage Lead Time?
- What Should You Take Away for Planning Prototypes vs. Production?
- Ready to Request a 3D Printing Quote?
- Sources
- FAQ
How Long Does 3D Printing Take By Process?
The technology you choose sets the floor for how fast a part can move, and each process has its own bottleneck that has nothing to do with raw print speed.
FDM is the fastest process to schedule because it needs no wash station, no cure oven, and no powder recovery. Simple prototypes often ship in 2 to 7 days, with rush requests occasionally compressed to 1 to 3 days if the shop has open capacity. Resin-based printing (SLA/DLP) adds isopropyl alcohol washing and UV curing after the print finishes, which pushes typical delivery to 3 to 7 days even though the print itself may run only a few hours.
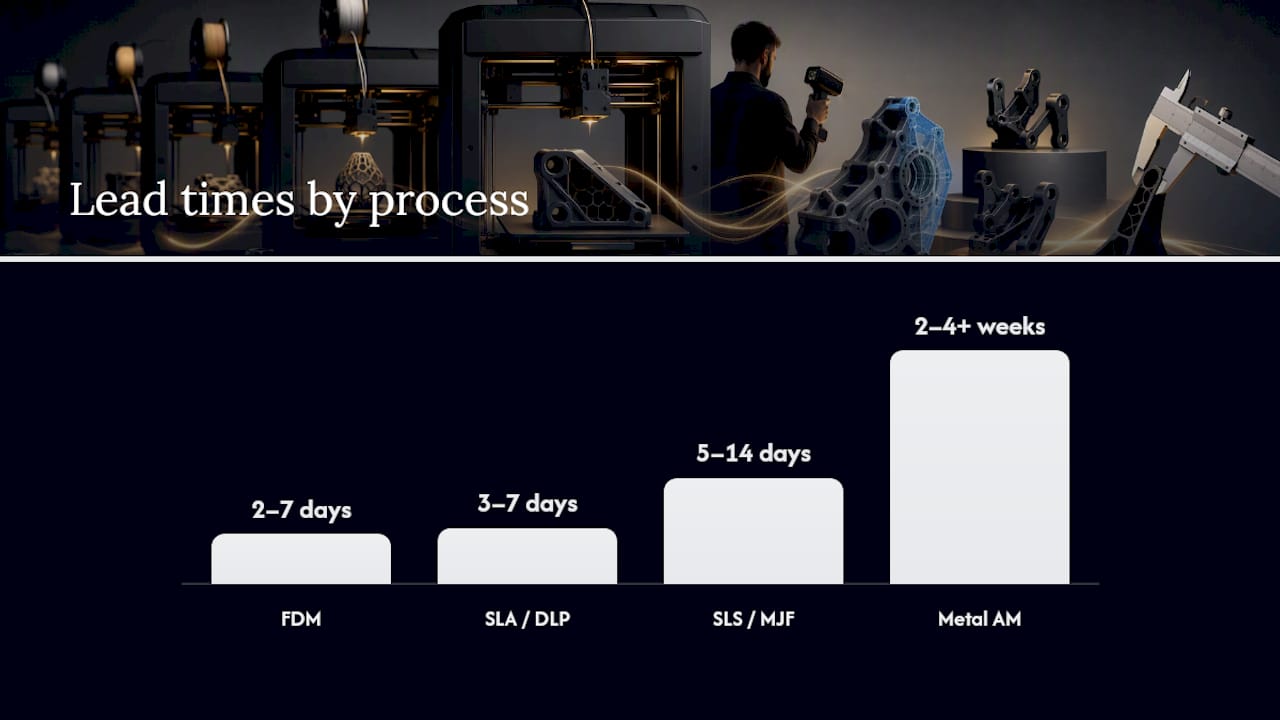
Powder-bed processes like SLS and MJF depend on batch scheduling. These machines run most efficiently when a build chamber is packed with multiple parts from different customers, so your job often waits for enough volume to justify a run. That queueing pushes realistic lead times to 5 to 14 days.
Metal additive manufacturing carries the longest and widest range, frequently 2 to 4 weeks or more. The print itself is rarely the bottleneck. Post-print heat treatment, stress relief, CNC machining of critical features, and dimensional inspection for traceability all add fixed, physics-bound days that no amount of scheduling can compress.
- FDM: 2 to 7 days, rush windows of 1 to 3 days when capacity allows
- SLA/DLP: 3 to 7 days, extended by wash and cure cycles
- SLS/MJF: 5 to 14 days, driven by batch scheduling
- Metal: 2 to 4+ weeks, driven by heat treat, machining, and inspection
Quantity moves every one of these ranges. A single prototype in FDM might clear in two days, while ten units in the same material can add a day or two of print queue time plus extra post-processing labor.
What Stages Make Up Total Lead Time?
Machine build time is usually the smallest visible piece of the total clock. The full workflow includes several stages that each carry their own dependencies, and understanding them explains why a “two hour print” can still mean a five-day delivery.
- Quote and file review, which can take minutes for a clean, dimensioned file or days if the shop has to request corrected geometry.
- Technical release, the point where the design is locked and scheduled onto the production floor.
- Build preparation, including slicing, orientation, support generation, and material staging.
- Print time, the actual machine hours, which vary with part size and printer class.
- Post-processing, covering support removal, sanding, or assembly, often adding hours to a full day per batch.
- Inspection, where dimensions and surface quality get checked against the request.
- Packing and shipping, typically 1 to 5 days domestically depending on carrier and destination.
The stages that catch buyers off guard are usually the invisible ones: incomplete STEP or STL files that trigger a round of clarifying questions, a material that’s out of stock and needs reordering, a printer queue that’s already full for the week, or a slow approval on a proof photo. Each one can add a day or more before the machine even starts. Supplying a complete file package with a confirmed quantity, a stated finish requirement, and any critical tolerances up front removes most of that back-and-forth, a point echoed in guidance on what affects 3D printing lead time from shops that see the same file gaps repeatedly.
How Do You Estimate Print Time Without a Slicer?
Print time comes down to volumetric flow rate: how many cubic millimeters of filament a printer’s hot end and cooling system can reliably push per second. Once you know a printer’s flow rate and a part’s mass, you can estimate build hours without ever opening slicer software.
The working formula, drawn from SpoolMath’s flow-rate-based estimation method, is:
Time (seconds) = (Grams × 806.5 ÷ Flow Rate in mm³/s) × Overhead
The constant 806.5 converts grams of standard PLA filament into cubic millimeters using its density. Flow rate varies by printer class, nozzle size, and cooling capability, and that variation explains why two machines can take two to three times longer to print the identical file.
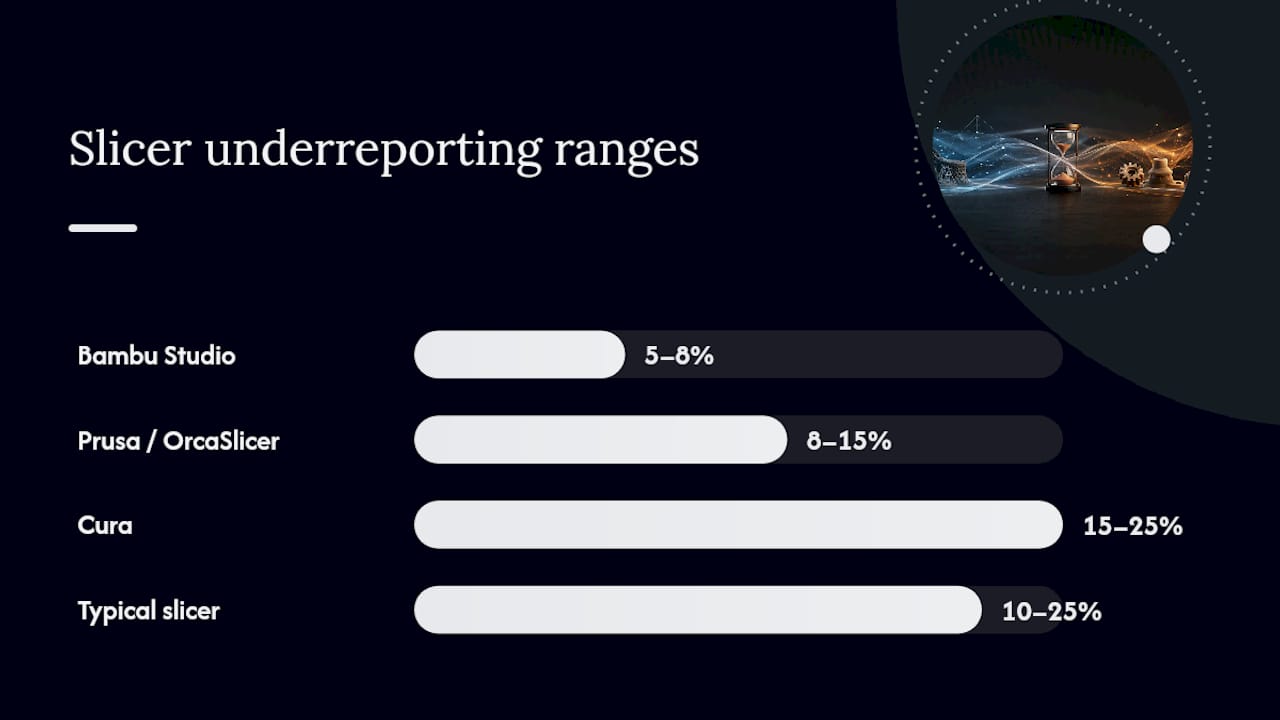
Overhead is where slicer estimates fall apart. Slicer software commonly underreports real print time by 10 to 25 percent because it doesn’t fully account for travel moves, acceleration ramps, retraction, and support structures. The gap varies by slicer: Bambu Studio tends to run 5 to 8 percent low, PrusaSlicer and OrcaSlicer 8 to 15 percent, and Cura as much as 15 to 25 percent, according to SpoolMath’s slicer comparison data. Complex geometry with lots of small islands, overhangs, or fine detail pushes overhead toward the higher end of each range, since the nozzle spends more time decelerating and repositioning than actually extruding.
How Can You Shorten 3D Printing Lead Times?
Speeding up delivery has far less to do with printer speed than with removing the friction points that stall a job before it ever reaches the build plate.
- Submit clean STEP or STL files with defined tolerances and a stated intended finish so the shop can quote without a clarifying email.
- Confirm quantity and acceptance criteria upfront. A one-off prototype and a 50-unit batch are scheduled differently from day one.
- Consider a raw, as-printed finish instead of sanded or painted parts when appearance doesn’t matter for early testing. Finishing labor is one of the easiest stages to skip for a first-round prototype.
- Simplify unnecessary geometry (thin walls, tiny bosses, deep undercuts) that forces slower print settings or extra support material.
- Ask which event starts the committed lead time, since a shop’s “3 day turnaround” means nothing if you don’t know whether the clock starts at payment, at technical release, or at file receipt.
Rush fees work when they buy you a spot at the front of a real queue or cover overtime labor. They accomplish nothing against physics-bound steps like resin curing, metal heat treatment, or multi-day post-processing chemistry, a distinction Find3DPrinting’s lead-time analysis makes clear when comparing rush options across processes.
Pro Tip: Ask your shop for milestone dates, not just a delivery window. “Production complete,” “ready to ship,” and “usable in hand” are three different events, and pinning your internal schedule to the wrong one is the single most common planning mistake buyers make.
How Does CC 3D Labs Quote and Manage Lead Time?
A professional 3D printing service runs a production farm of FDM printers for prototypes, functional parts, and small-batch runs in various materials, with multi-color and multi-material printing available. We also offer professional handheld 3D scanning (accuracy to about 0.1 mm) for reverse engineering and part reproduction, plus CAD design and printed mold masters.
Every production job gets quoted individually after a test print of the actual model rather than from a generic price sheet. That test print catches slicer-overhead surprises, support needs, and material behavior before we commit to a schedule, which makes the resulting date far more reliable than a guess based on file size alone. Include your file format, target quantity, material preference, and intended finish when you request a quote. It’s the fastest way to get an accurate answer instead of a round of follow-up questions.
What Should You Take Away for Planning Prototypes vs. Production?
Build a margin into every schedule and treat sample approval as a separate milestone from production start. A part that arrives on time but in the wrong finish, tolerance, or material still misses the deadline that mattered.
The right process is the one that meets your delivery condition on arrival, not the one with the shortest printed-hours estimate on paper.
— Justin
Ready to Request a 3D Printing Quote?
This service is an alternative to guessing at generic online calculators for readers who need real prototypes or a small-batch run and not just a printed-hours estimate on a screen. Every job runs through our services catalog and gets a live test print before we commit to a schedule, which means the date you’re given reflects your actual part, not a template.
Upload your STEP or STL file, note your target quantity, preferred material, and intended finish, and we’ll turn that into a real quote instead of a placeholder range. If your part started life as a physical object rather than a CAD file, our 3D scanning lab can capture it first. We don’t publish blanket turnaround promises because every test print behaves a little differently, but we do give you a committed date once that print is done. Start your request at Cc3dlabs, or head to the scan quote page or the CAD quote page if your project starts with a physical part or a design that needs modeling first.
Sources
- SpoolMath: How long do 3D prints take? (includes flow-rate examples and calculator)
- Find3DPrinting blog: 3D printing lead times
FAQ
How Long Does It Usually Take to 3D Print Something?
Print time itself typically runs from under an hour for a small trinket to a full day for a large, dense part, depending on size, material, and printer flow rate. Total delivery, including quoting, post-processing, and shipping, is usually 2 to 7 days for FDM parts.
How Long Does a 3D Printer Take to Finish a Print Job?
The machine run time itself depends on part mass and the printer’s volumetric flow rate, calculated as grams multiplied by 806.5 and divided by flow rate in cubic millimeters per second. A 200 gram part on a high-flow production printer often takes around 3 hours of actual print time, before slicer overhead and post-processing are added.
How Much Should You Budget for an Hour of 3D Printing?
CC 3D Labs doesn’t publish a flat hourly rate. Every job is quoted individually after a test print of the actual model, since material, geometry, and finish all change what an hour of machine time actually costs. Current service details are available on the CC 3D Labs services page.
Is There a Legal Limit on What You Can 3D Print?
3D printing itself is a legal manufacturing process. The concern behind this question usually involves specific restricted items, such as untraceable firearm components, which are regulated under federal and state law regardless of the manufacturing method used to make them. The service does not manufacture firearms or firearm components.
Why Does My Slicer’s Estimate Never Match the Real Print Time?
Slicer software tends to underreport actual print time because it doesn’t fully account for travel moves, acceleration, and support structures. Depending on the slicer, that gap commonly runs 5 to 25 percent low, with Cura typically showing the widest margin and Bambu Studio the narrowest.