
TL;DR:
- Filament diameter tolerance of ±0.02mm ensures consistent, professional-grade 3D printing results.
- Proper material choice, printer calibration, and controlled environment are crucial for accuracy and repeatability.
- Systematic verification and measurement across batches prevent variability and enhance manufacturing reliability.
Even a 0.05mm variation in filament diameter can push a prototype over tolerance, trigger failed prints, and delay your product launch by days or weeks. For product developers and small manufacturing teams, that is not a minor inconvenience. It is a real business cost. ±0.02mm filament tolerance is the benchmark separating consistent, professional-grade output from frustrating batch failures. This guide walks you through every stage of custom filament printing, from material selection and printer setup to parameter tuning and quality verification, so you can produce parts that hold tolerance and hold up under real-world conditions.
Table of Contents
- Understand filament types and requirements
- Set up your printer for custom filament printing
- Optimize print parameters for strength and accuracy
- Quality verification and troubleshooting
- Why most guides miss what actually matters in custom filament printing
- Take your custom filament printing further with CC3DLabs
- Frequently asked questions
Key Takeaways
| Point | Details |
|---|---|
| Choose the right filament | Proper filament type and tolerance are the foundation for consistent, successful prints for prototypes and production. |
| Calibrate and control environment | Printer calibration and environmental controls are just as critical as material choice for avoiding common failures. |
| Optimize print parameters | Fine-tuning orientation and slicer settings can dramatically boost part strength and accuracy. |
| Verify print quality | Regular, measured quality checks catch inconsistencies early, ensuring confidence in every print run. |
| Expert help accelerates results | Partnering with a specialized 3D printing service speeds up learning, minimizes costly mistakes, and delivers reliable prototypes. |
Understand filament types and requirements
Choosing the right filament is not just about matching color to your brand palette. Material selection determines whether your functional prototype survives a stress test, fits into an assembly, or ships with consistent surface quality across a batch. Getting this decision right upfront saves you rework time and material cost.
Core filament types and where they fit:
- PLA: Easy to print, dimensionally stable, ideal for concept models and display prototypes. Not suited for heat or mechanical stress.
- PETG: Balances strength and printability. Great for functional parts, but it is hygroscopic and requires drying before use to avoid bubbles and stringing.
- ABS: Tough and heat-resistant, essential for functional housings and mechanical parts. Needs an enclosure to prevent warping.
- Nylon: High impact resistance and flexibility, but absorbs moisture aggressively. Drying is non-negotiable.
- Carbon fiber, glow-in-the-dark, and metal-filled filaments: Abrasive composites that demand hardened steel nozzles, or you will wear through a standard brass nozzle within hours.
| Filament | Enclosure needed | Drying required | Nozzle type |
|---|---|---|---|
| PLA | No | Rarely | Brass |
| PETG | Optional | Yes | Brass or hardened |
| ABS | Yes | Rarely | Brass |
| Nylon | Yes | Yes | Hardened steel |
| Carbon fiber | Yes | Yes | Hardened steel |
Tolerance matters more than most developers realize. A filament rated at ±0.02mm produces under 1% volumetric variation, keeping flow rates consistent across long print runs. Once you step down to ±0.05mm, you are looking at nearly 3% volumetric swing, which shows up as over-extrusion on some layers and under-extrusion on others. You can find more material-specific advice in our prototyping filament guide or dig into a side-by-side breakdown with PLA vs PETG vs ABS.
Color additives also affect printability. Dark pigments, particularly black, absorb more heat and may require a slightly lower temperature than a natural or white version of the same material. Always run a temperature tower when switching colorways on a critical production run.
Pro Tip: Store all hygroscopic filaments in sealed containers with silica gel desiccant between print sessions. Even a few hours of open-air exposure in a humid environment can ruin a spool of Nylon or PETG.
Set up your printer for custom filament printing
Once your material is chosen, your printer and workspace need matching attention. A well-selected filament will still produce poor results if the hardware delivering it is out of calibration or operating in an uncontrolled environment.
Start with these setup steps in order:
- Level the print bed. A bed that is even 0.1mm off across its surface will cause adhesion failures on the first layer, which cascades into every layer above it.
- Clean the hot end. Residual material from a previous filament run causes contamination, especially when switching from a high-temperature material to a lower-temperature one.
- Check the extruder tension. Too tight and you grind the filament. Too loose and steps are skipped. Both cause inconsistent flow.
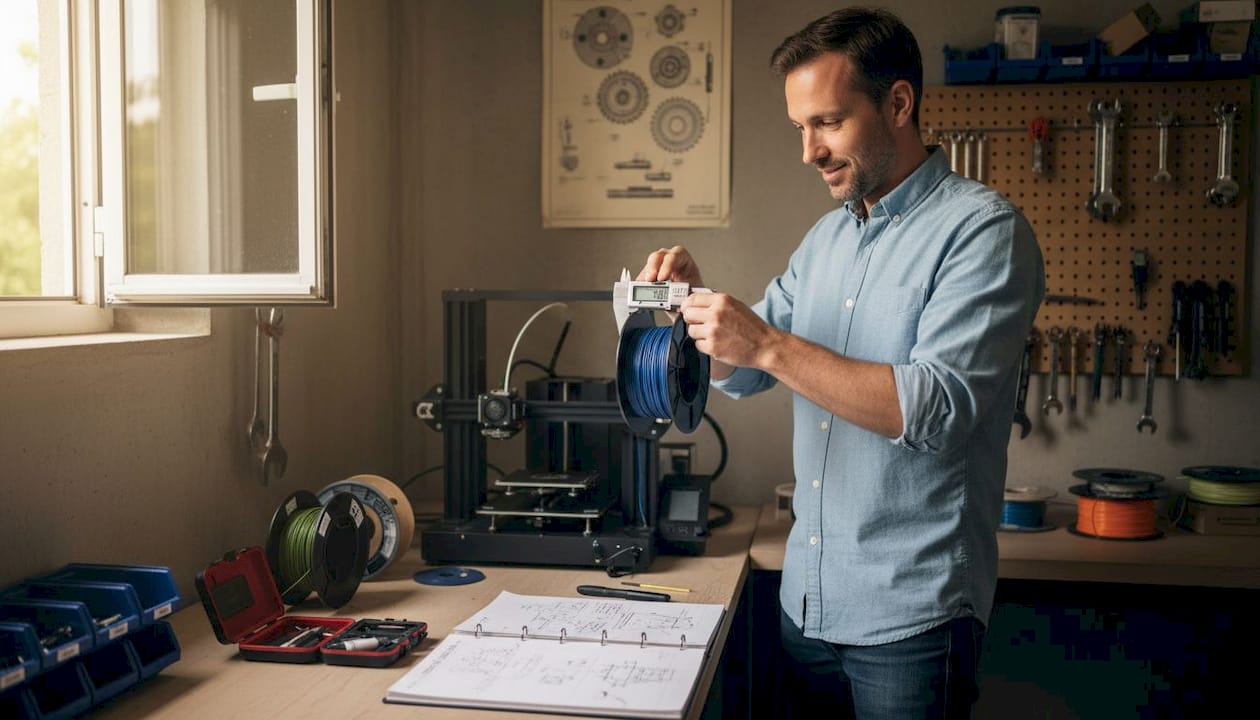
- Calibrate your extruder steps per mm. Mark 100mm of filament, extrude it, and measure what actually moved. Adjust until the numbers match.
- Set nozzle diameter to match your job. Abrasive filaments require a hardened nozzle. Standard brass erodes fast under carbon fiber or metal-filled materials.
Environment matters too. ±0.05mm diameter variation creates a 2.8% volumetric swing that no software setting can fully compensate for, but ambient temperature swings make things worse. ABS requires a fully enclosed printer to maintain a consistent chamber temperature and prevent warping from drafts. Hygroscopic materials need controlled humidity both in storage and during printing.
A stable printer in a controlled workspace produces more consistent results than a high-end machine sitting in a drafty, humid shop floor. Environment is not optional.
| Printer check | What to look for | Tool needed |
|---|---|---|
| Bed level | Even first layer adhesion | Feeler gauge or probe |
| Extruder calibration | 100mm extrusion accuracy | Ruler or calipers |
| Hot end cleanliness | No residue or discoloration | Cold pull or cleaning filament |
| Nozzle condition | No erosion on tip | Visual inspection |
For batch production specifically, you will want to build a pre-run checklist. Our low-volume manufacturing tips walk through setup routines designed to keep quality consistent across dozens of parts. If you are deciding between printer types for your workflow, choosing the right printing type covers that decision in detail.
Pro Tip: Run a small calibration cube before every new filament spool or environmental change. It takes five minutes and tells you immediately if something has drifted.

Optimize print parameters for strength and accuracy
Once hardware is ready, fine-tuning print parameters maximizes your results. Slicer settings are where most developers either gain or lose the edge on part performance.
Orientation is the most underestimated variable in filament printing. FDM parts are anisotropic, meaning they are stronger along the layer plane than perpendicular to it. Placing a part so its primary load axis runs parallel to the print bed increases stiffness dramatically. Parameter optimization, including orientation and layer height adjustments, has been shown to boost part stiffness by 81 to 128%. That is not a marginal gain. It is the difference between a prototype that passes mechanical testing and one that snaps during the first use cycle.
Follow this sequence when dialing in parameters for a new job:
- Set orientation first. Analyze load direction and place the strongest axis in line with expected stress.
- Choose layer height. Thinner layers (0.1mm to 0.15mm) improve surface detail and interlayer bonding for functional parts. Thicker layers (0.2mm to 0.3mm) speed up prototyping when detail is less critical.
- Tune temperature. Advanced materials like PETG and Nylon run hotter and benefit from a temperature tower to find the sweet spot for flow and layer adhesion without stringing.
- Set print speed. Slower speeds improve accuracy. For precision prototypes, drop below 40mm/s on perimeters.
- Adjust cooling. PLA needs active cooling. ABS and Nylon need minimal or no cooling to prevent layer delamination.
Black filaments deserve a specific note. Because of their higher heat absorption, black variants of the same base material often need a temperature reduction of 5°C to 10°C compared to neutral colors. Skipping this step leads to over-melting and oozing on fine features.
For guidance on building print-ready geometry that supports these parameters, our resource on designing reliable prints and optimizing your CAD workflow are worth your time before you hit slice.
Pro Tip: Never rely on a slicer’s default profile for a production run. Always run a first-article part with your specific filament, nozzle, and environment before committing to a full batch.
Quality verification and troubleshooting
With parameters optimized, assess and fix your results for business-grade consistency. Printing one good part is not the goal. Printing forty identical good parts is.
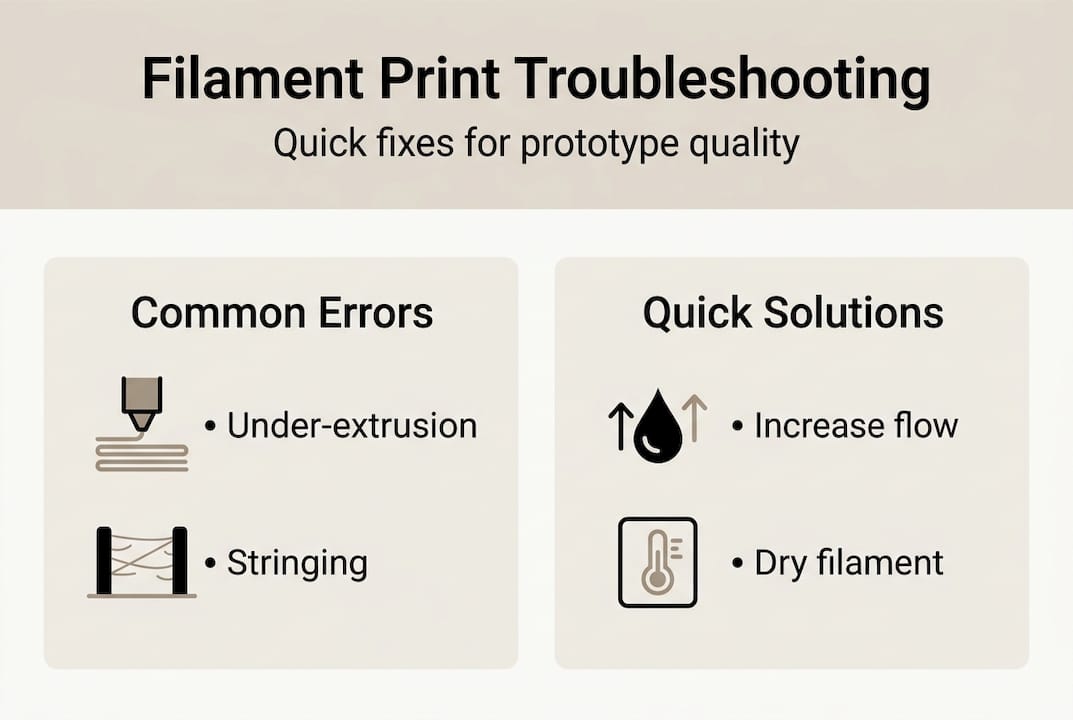
Start with visual inspection on every part:
- Layer lines: Should be uniform in height and spacing. Inconsistent lines point to extruder slippage or filament diameter variation.
- Wall smoothness: Rough or pitted walls signal moisture in the filament or a clogged nozzle.
- Color consistency: Streaks or shade shifts mid-print indicate contamination or temperature instability.
After visual checks, measure. Use calipers to verify critical dimensions against your CAD model. Tolerance variations at ±0.02mm create under 1% dimensional error, while ±0.05mm filament pushes that beyond 2.8%. For parts going into assemblies, even 0.1mm of deviation can mean a misfit. Document your measurements across each batch so you can track drift over time.
Iteration is not failure. Running three calibration parts before a 50-piece batch is a quality investment, not wasted material.
| Common error | Symptom | Solution |
|---|---|---|
| Under-extrusion | Thin walls, gaps in layers | Increase flow rate, check extruder tension |
| Over-extrusion | Blobbing, rough surfaces | Reduce flow rate or temperature |
| Warping | Lifted corners | Use enclosure, increase bed adhesion |
| Stringing | Fine threads between features | Increase retraction, reduce temperature |
| Layer delamination | Cracks between layers | Increase temperature, reduce cooling |
For visual references of what precision output actually looks like at each stage, our prototype quality examples show real parts printed to specification.
Why most guides miss what actually matters in custom filament printing
Most online guides focus on slicer profiles and temperature charts. Those things matter, but they are not the ceiling. The real ceiling for manufacturing reliability is filament consistency and systematic verification across batches.
Here is what experience teaches you: even a premium slicer profile running on a well-calibrated machine cannot compensate for a filament spool with inconsistent diameter. If the material feeding into your nozzle varies by 0.05mm or more throughout the spool, your flow rate fluctuates regardless of your settings. You can tune all day and still see surface variation on parts 20 and 40 that looked fine on parts 1 and 2.
The second thing most guides skip is the difference between a successful single print and a repeatable process. For a product developer or small manufacturer, repeatability is everything. One good prototype means little if your next run of 30 parts has visible variation. Build a verification step into every run. Measure early, measure often, and document what you find. That process discipline is what separates hobbyist output from professional manufacturing output.
Our additional prototyping strategies go deeper into building that kind of repeatable workflow.
Take your custom filament printing further with CC3DLabs
If you are hitting the limits of what in-house printing can deliver for precision, batch consistency, or advanced materials, working with an experienced team changes the equation.

At CC3D Labs, near Philadelphia, we specialize in custom filament-based 3D printing for product developers and manufacturing teams who need parts that perform, not just parts that look right on a screen. Our 3D printing services cover everything from single prototypes to production runs, with material expertise and quality verification built into every job. Want to know what is possible before you commit? See our printing capabilities and browse real-world prototype case studies to see the standard we hold our work to. Reach out for a free estimate and let us help you get it right the first time.
Frequently asked questions
What is the ideal filament tolerance for precision 3D printing?
A filament diameter tolerance of ±0.02mm delivers the best print consistency for prototypes and low-volume manufacturing, keeping volumetric variation under 1%.
Why do some filaments require drying before printing?
Hygroscopic filaments like PETG and Nylon absorb moisture from the air, which causes bubbling, poor layer adhesion, and stringing unless the material is thoroughly dried before printing.
How does orientation impact 3D printed part strength?
Optimizing part orientation during slicing aligns the strongest axis with the load direction, with research showing stiffness improvements of up to 128% compared to default orientations.
How do you check if your print is accurate?
Measure critical dimensions with calipers and compare them to your CAD model. Tolerance variations above ±0.05mm can push dimensional error past 2.8%, which is unacceptable for assembly-fit parts.