

TL;DR:
- Proper planning, environmental prep, and validation are essential to ensure accurate 3D scans.
- Selecting the right scanner depends on part size, detail needed, and surface properties.
- Rushing steps or skipping validation increases costly errors despite hardware quality.
One missed step in a 3D scanning workflow can send a prototype back to square one. For product developers and engineers, that means wasted hours, rework costs, and delayed production timelines. A structured checklist is not a bureaucratic formality; it is the difference between a scan you can trust and one that looks fine until the part fails tolerance checks on the shop floor. This guide walks through every critical phase: setting objectives, choosing the right scanner, preparing your environment, executing the scan, and validating results with objective metrics. Follow it consistently, and you will eliminate the most common sources of scanning error before they become expensive problems.
Table of Contents
- Set clear objectives and scan requirements
- Choose the right scanner and scanning method
- Prepare the part and environment for scanning
- Scan execution: capturing, validating, and optimizing data
- Why most 3D scanning projects fail: The hidden checklist gaps
- Ready to streamline your 3D scanning workflow?
- Frequently asked questions
Key Takeaways
| Point | Details |
|---|---|
| Define scanning requirements | Clear goals and part specs are essential for selecting methods and validation metrics. |
| Match scanner to project | Choose equipment based on part size and complexity for the highest accuracy. |
| Control prep and setup | Careful part and environment preparation dramatically reduces errors and rescans. |
| Validate with metrics | Use CF3D%, MD3D, and SQI3D to objectively confirm scan quality before moving to production. |
| Checklists prevent failures | Following a robust checklist is more effective than relying solely on expensive scanners. |
Set clear objectives and scan requirements
Every reliable 3D scan starts before you touch any hardware. The first step is defining exactly what you need the scan to accomplish, because that decision shapes every choice that follows.
Start by identifying the end use. A scan intended for a concept prototype has very different accuracy requirements than one destined for a production-ready part or a reverse-engineering workflow. Confusing these two contexts is one of the fastest ways to waste a scanning session.
Document the following before you begin:
- Part material and surface finish (matte, glossy, translucent, or metallic surfaces each require different handling)
- Overall dimensions and geometric complexity (simple prismatic parts versus freeform organic geometry)
- Required dimensional tolerance (what deviation is acceptable in millimeters or microns?)
- Downstream use (CAD comparison, mesh-to-print, inspection report, or reverse engineering)
- Deliverable format (STL, OBJ, STEP, or point cloud)
These five data points define your success criteria upfront. Without them, you are scanning blind.
Once you have your requirements documented, tie them to quantitative metrics. Quantitative metrics for 3D scanning research confirms you should always validate with Coverage Factor (CF3D%), Mean Distance (MD3D), and Scan Quality Index (SQI3D). CF3D% measures how much of the target surface your scan actually captured. MD3D quantifies the average deviation between your scan and the reference geometry. SQI3D combines multiple quality indicators into a single score for fast pass/fail decisions.
“Metric-based validation removes guesswork from the quality assessment process and creates a repeatable standard your entire team can apply.”
Setting these thresholds before the scan begins means you have an objective target to hit, not just a visual impression to judge. Understanding design accuracy and prototyping requirements is the foundation that makes every downstream decision faster and more defensible.
Pro Tip: Write your tolerance and metric thresholds directly on your scan request form. When multiple engineers are involved, this single habit eliminates the most common source of miscommunication between scanning and design teams.
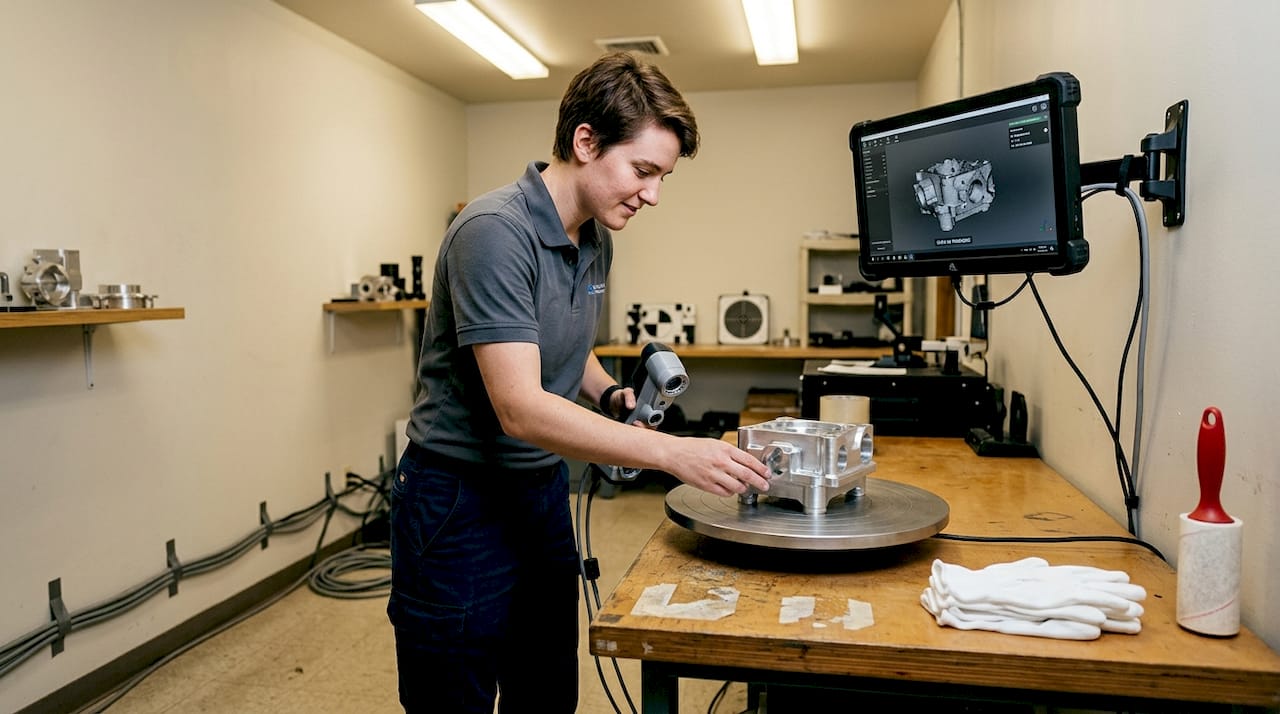
Choose the right scanner and scanning method
With clear requirements in hand, the next step is selecting a scanner and scanning approach that fits those needs precisely. The wrong scanner type is not just a minor inconvenience; it can make it physically impossible to meet your documented tolerance requirements.
Here is a breakdown of the three most common scanner types used in engineering and product development:
- Handheld laser scanners: Best for medium to large parts, complex assemblies, and on-site scanning. They offer flexibility and portability but typically deliver accuracy in the 0.05 to 0.1 mm range. Handheld laser scanners excel for prototypes up to 10 meters, while structured light scanners are the better choice for small, detailed parts.
- Structured light scanners: Best for small to medium parts requiring high detail and tight tolerances. They project a pattern of light onto the surface and calculate geometry from the distortion. Accuracy can reach 0.01 mm or better, but they require a controlled environment and a stationary setup.
- Photogrammetry: Best for very large objects or when portability is the priority. It uses overlapping photographs to reconstruct geometry. Accuracy is lower than laser or structured light methods, but it scales well and requires minimal equipment.
Matching the scanner to the part is not just about size. Consider these factors:
- Surface reflectivity: Shiny or dark surfaces defeat most laser systems without preparation.
- Feature size: Fine threads, sharp edges, or thin walls need structured light resolution.
- Scan environment: Outdoor or production-floor scanning favors handheld systems.
- Operator experience: Structured light systems have steeper learning curves.
Pro Tip: Do not let the scanner’s marketed accuracy spec be your only decision factor. Ask vendors for accuracy data on parts that match your geometry and surface type, not just flat reference artifacts.
If your project involves custom prototypes, understanding what makes the best print job for prototypes helps you align scanning precision with the print process you plan to use downstream. Similarly, reviewing how to choose the right printing type for production ensures your scan data will actually support the manufacturing method you intend to use.
Prepare the part and environment for scanning
Once you have the right scanner, expert results depend on methodical setup. This is the phase most engineers rush, and it is where most scan failures originate.
Follow this numbered preparation sequence every time:
- Clean the part thoroughly. Remove dust, oils, and loose debris. Even fine particles scatter laser light and introduce noise into the point cloud.
- Apply scanning spray if needed. Reflective, dark, or translucent surfaces require a temporary matte coating. Use a thin, even layer and allow it to dry completely.
- Secure the part with fixtures. Movement during scanning is the single biggest source of data misalignment. Use a turntable, magnetic fixture, or custom jig appropriate for the part geometry.
- Calibrate the scanner. Run the manufacturer’s calibration routine before every session, not just at the start of the day. Temperature changes affect optics.
- Set reference targets if required. Adhesive targets help the scanner track position across multiple scan passes on complex geometry.
Surface preparation and stable positioning are vital for reliable scans, and skipping either step creates problems that no amount of post-processing can fully correct.
Beyond the part itself, check these environmental factors:
- Vibration: Isolate the scanning area from foot traffic, HVAC equipment, and nearby machinery.
- Ambient light: Structured light scanners are sensitive to sunlight and fluorescent flicker. Use blackout curtains or scan in a dedicated room.
- Background contrast: Place a neutral, non-reflective background behind the part to prevent the scanner from picking up stray geometry.
- Temperature stability: Thermal expansion affects both the part and the scanner optics. Allow both to acclimate to room temperature before starting.
For a detailed look at what a controlled scanning environment looks like in practice, review our high quality 3D scan process guide. You can also explore our 3D Scanning Lab process or submit a 3D Scan Request Form to get professional support on your next project.
Scan execution: capturing, validating, and optimizing data
With preparation complete, conducting the scan itself and validating results is where the checklist really proves its value. A clean setup does not guarantee a clean scan; you need a disciplined execution sequence.
Follow these steps in order:
- Run an initial scan pass and review the raw mesh immediately. Do not wait until the end of the session to discover a problem area.
- Check coverage visually and by CF3D% threshold. Any region below your target coverage percentage needs a re-scan pass before you move the part.
- Identify and re-scan problem areas: undercuts, deep pockets, and thin walls are the most common trouble zones.
- Align multiple scan passes using reference targets or software registration. Check alignment error before merging.
- Export the validated mesh in the format your downstream workflow requires.
Here is a quick reference for the most common scan errors and how to address them:
| Scan error | Validation metric | Corrective action |
|---|---|---|
| Missing surface coverage | CF3D% below threshold | Add scan passes from new angles |
| High deviation from reference | MD3D exceeds tolerance | Re-calibrate scanner, re-scan |
| Low overall quality score | SQI3D fails | Review all prep steps, repeat session |
| Mesh noise or spikes | Visual + MD3D | Reapply scanning spray, reduce ambient light |
| Misaligned scan passes | MD3D between passes | Re-register using reference targets |
Validation metrics like CF3D%, MD3D, and SQI3D are essential for trustworthy scans, and applying them at each stage rather than only at the end catches errors while correction is still fast and cheap.
“A scan that passes visual inspection but fails metric validation is not a scan you can build a production part from.”
For export, use formats your CAD and manufacturing tools handle natively. Learning how to optimize workflow with CAD file formats prevents conversion errors that degrade scan accuracy. If you are newer to the terminology around scan outputs, the printing terminology for product developers guide clarifies common file type distinctions. For specialized applications like dental scanning standards, metric validation follows the same core principles but with even tighter tolerances.
Why most 3D scanning projects fail: The hidden checklist gaps
After working through hundreds of scanning projects, the pattern is clear: most failures are not hardware failures. They are process failures. The scanner was adequate. The operator was experienced. But someone skipped a step.
The three most common hidden gaps are rushing the setup phase, skipping metric validation in favor of visual approval, and assuming the scanner is inherently accurate enough without confirming it against your specific part geometry. Each of these feels like a time-saving shortcut in the moment and becomes a costly rework cycle later.
Skipped validation is a leading source of downstream part defects, and it is almost always avoidable. A five-minute metric check at the end of a scan session is far cheaper than discovering dimensional errors after a part has been printed or machined.
The uncomfortable truth is that a disciplined checklist on a mid-range scanner outperforms an ad-hoc process on a top-tier system every time. Hardware does not compensate for skipped steps. If you want to build a scanning workflow your team can trust, start with achieving high quality scans as your process baseline, then layer in metric validation as a non-negotiable exit criterion for every session.
Ready to streamline your 3D scanning workflow?
If your team is ready to move from ad-hoc scanning to a repeatable, validated process, CC 3D Labs is set up to support exactly that. We offer metrology-grade scanning, full prototyping, and expert guidance for product developers and engineers who need results they can build on.

Explore our 3D Scanning Lab services to see how we handle complex parts and tight tolerances. If your project needs both scanning and production, our full 3D printing services keep everything under one roof. And if you want to go deeper on best practices before you start, our high quality scan guide is the right next read. Get a free estimate and let us help you get it right the first time.
Frequently asked questions
What are the most important metrics for validating a 3D scan?
The key metrics are Coverage Factor (CF3D%), Mean Distance (MD3D), and Scan Quality Index (SQI3D). These three validation metrics quantify how complete and accurate your scan data is, giving you an objective pass/fail standard.
How do you select the right scanner for a specific part?
Base your choice on part size and required detail level. Scanner selection should match part size and complexity, with handheld lasers for larger prototypes, structured light for small intricate parts, and always confirm results with metric validation.
Why is environmental preparation important for 3D scanning?
Unstable or contaminated environments introduce noise, reflections, and misalignment errors that degrade scan accuracy. Surface and environmental prep is crucial for correct scans, and no post-processing step can fully recover data lost to a poor setup.
What mistakes commonly lead to poor scan quality?
Skipping preparation or validation reduces scan quality more than any hardware limitation. Using a mismatched scanner type for the part geometry is the third most frequent cause of rework.
How can engineers streamline 3D scanning workflows?
Standardize your setup sequence, define metric thresholds before each session, and treat the checklist as a non-negotiable process step. Detailed checklists and metric validation streamline workflows by catching errors early, when correction is fast and inexpensive.